In this tutorial, I’m assuming that you have written or are writing a Python web application that uses Django, and you want to deploy that application onto Microsoft Azure.
I’m not going to cover how to create or write a Django application, but instead, we’re going to focus on the last mile of development- getting it into production.
In this tutorial, we will cover:
- How to set up your development environment for reproducability
- How to setup Azure Web App for Django
- How to use Azure Postgres services for the Django database
- How to use Azure Storage to host your static and media files
- How to test your application locally and on CI/CD
- How to harden the security of your development and runtime environments
- How to test the performance of your application and fine tune it
- How to setup error monitoring and performance metrics in Azure Application Insights
The code for this tutorial is up on my GitHub.
I’m assuming that you already have:
- A subscription to Microsoft Azure
- Knowledge and experience with Python and Django
- Something to deploy :-)
Setting up your requirements
A common developer workflow is to create a local virtual environment, install the dependencies and tools needed for running the application, testing it, and linting it into the same
virtual environment, and then running pip freeze > requirements.txt to save the state of the environment so that it is reproducible.
Something really important to note is that the Azure deployment script will automatically install your PyPi requirements listed in requirements.txt onto the container each time it is deployed.
For that reason, I recommend that you put additional planning into separating the requirements of your virtual environments. I recommend not to have a single requirements.txt file, because:
- You are deploying packages into the environment of the production image that are not required
- You are more likely to hit packaging version conflicts
- You are more likely to have security holes by deploying more packages onto production
Instead, I recommend either to use an environment manager or to keep your requirements separate between runtime, development, and testing.
These are the 3 sets of package requirements I would setup instead:
requirements.txt- the runtime requirements for production and staging environmentsrequirements-dev.txt- the additional requirements forrequirements-test.txt- any testing tools and libraries
For example, your runtime requirements should be pinned to the specific version of Django and your extensions that you require:
requirements.txt
django==3.0.4
django-storages[azure]==1.9.1
psycopg2-binary==2.8.4
Your development requirements should include that and the linters, etc. that you need:
requirements-dev.txt
-rrequirements.txt
black
flake8
Your test requirements should include the runtime requirements and the test runner. If you’re using Pytest and tox, that would be:
requirements-test.txt
-rrequirements.txt
pytest
pytest-django
pytest-cov
tox
Web Application
To run the Django application, Azure provides a Web Application service, Azure App Service.
I recommend having a minimum of two Apps deployed,
- A staging environment running the P1V2 App Service Plan (or above)
- A production environment running one or more P2V2 (or above) App Service Plans
Most web applications are memory-hungry before they are CPU-hungry, which is why I recommend the P2V2 for production. Running a P1V2 just for staging might be a high cost for some, so you can either stop the image outside of testing cycles or drop this down to a slower app plan.
During this tutorial, we will make major optimizations to our application to get the most out of each instance.
Deployment by CLI
If you want to deploy using the CLI, then first create a deployment user using the Azure CLI:
az webapp deployment user set --user-name <username> --password <password>
Next, create the plans for staging and production:
az appservice plan create --name staging --resource-group yourResourceGroup --sku P1V2 --is-linux
az appservice plan create --name production --resource-group yourResourceGroup --sku P2V2 --is-linux
Next, create the two applications on Python 3.7, change app-staging and app-production with whatever you like:
az webapp create --resource-group yourResourceGroup --plan staging --name app-staging --runtime "PYTHON|3.7" --deployment-local-git
az webapp create --resource-group yourResourceGroup --plan production --name app-production --runtime "PYTHON|3.7" --deployment-local-git
Once you’ve created the Web App, there are some defaults that I recommend changing:
| Configuration Area | Setting | Recommended Value | Purpose |
|---|---|---|---|
| Settings -> Configuration -> General Settings | FTP State | Disabled | Disables FTP and FTPS deployments |
| Settings -> Configuration -> General Settings | Remote Debugging | Disabled | Stops remote application access for debuggers |
| Settings -> TLS/SSL Settings | HTTPS only | On | Requires HTTPS connections |
| Settings -> TLS/SSL Settings | Minimum TLS Version | 1.2 | Requires minimum TLS 1.2 |
Setting up Environment Variables
In the Django settings, you can have values that are defined at runtime using environment variables.
For example, you might want debug mode on locally, but it should never be on in production. So, if you create an environment variable, then you can toggle this easily.
SECRET_KEY = os.environ.get('SECRET_KEY', 'a^ndivwn2c$tdb+by=c=_p&p(eiua4@v7j(=qfu^8^lyyuolhi')
DEBUG = os.environ.get('DEBUG', False)

ALLOWED_HOSTS = [os.environ.get('DJANGO_HOST', 'localhost')]
Azure Web Apps have the ability to set environment variables that are set before the application starts. You can use this feature to control the behaviours of your app and set sensitive things like passwords without having to check them into Git.
There are two ways of changing environment variables by using the CLI or within the UI.
To change environment variables in the CLI, you can use a command like:
az webapp config appsettings set --name <app-name> --resource-group <resourcegroup-name> --settings ...
To change them inside the UI, they are within Settings -> Configuration -> Application Settings. The Advanced Edit button shows all of the environment variables in JSON format.
These secrets are encrypted at rest and in-transit, but if you still want to use Azure Vault, you can use Key References instead of the actual passwords.
Deployment
The easiest ways to deploy to either instance is from Visual Studio Code using the Azure extensions, or using Deploy from Local Git.
Each instance would have its own Git URL, shown in the UI or, on the CLI during creation.
git remote add staging <staging-git-url>
git remote add production <production-git-url>
Then, to deploy, you can simply push to either remote, and the rest will happen for you:
git push staging master
The default deployment process for Django will:
- Install all packages listed in
requirements.txt - Run
python manage.py collectstatic
It will not run python manage.py migrate or python manage.py makemigrations, so you need to complete these steps manually.
Changing the startup script
By default, Azure Web Apps will terminate HTTPS traffic and connect to your Django application using the WSGI entry-point and Gunicorn.
Azure effectively replaces the job that NGINX would normally do. It comes with a very conservative default configuration, so you will find that even on the more powerful App Plans, HTTP requests will get queued.
The more requests you throw at it, the longer the queue will get, even when the CPU is idle.
Instead, you can change the startup script by adding a file to your repository with the command(s) to run. I recommend using this to increase the number of Gunicorn threads and workers.
For Django 3, on the P2V2 Service Plan, use ASGI (async WSGI) instead of WSGI. The response time will remain the same, but the application will handle multiple simultaneous requests without blocking workers. This is my preferred configuration. Later in the article, we will do some benchmarking if you want to adjust the workers and threads:
gunicorn --workers 8 --threads 4 --timeout 60 --access-logfile \
    '-' --error-logfile '-' --bind=0.0.0.0:8000  -k uvicorn.workers.UvicornWorker \
     --chdir=/home/site/wwwroot django_on_azure.asgi
Make sure you add uvicorn to the requirements.txt file.
For Django 2, use the WSGI entry point with Gunicorn
gunicorn --workers 8 --threads 4 --timeout 60 --access-logfile \
    '-' --error-logfile '-' --bind=0.0.0.0:8000 \
     --chdir=/home/site/wwwroot django_on_azure.wsgi
To enable this startup command, you need to set the startup command to startup.sh in Settings -> Configuration -> General Settings -> Startup command. After making these changes, the application will restart.
Configuring your IDE
For Visual Studio Code, create a launch.json file inside the .vscode directory and put the environment variables into this file.
Just remember to not commit this file to Git!
You can add as many Django commands to this as you need:
{
    // Use IntelliSense to learn about possible attributes.
    // Hover to view descriptions of existing attributes.
    // For more information, visit: https://go.microsoft.com/fwlink/?linkid=830387
    "version": "0.2.0",
    "configurations": [
        {
            "name": "Run Django",
            "type": "python",
            "request": "launch",
            "program": "${workspaceFolder}/manage.py",
            "args": [
                "runserver",
                "--noreload"
            ],
            "env":
                {
                    /// Your environment variables...
                    "DJANGO_DEVELOPMENT": "True"
                },
            "django": true
        }, {
            "name": "Run Django Migrations",
            "type": "python",
            "request": "launch",
            "program": "${workspaceFolder}/manage.py",
            "args": [
                "migrate"
            ],
            "env":
                {
                    /// Your environment variables...
                    "DJANGO_DEVELOPMENT": "True"
                },
            "django": true
        }
    ]
}
For PyCharm, change the environment variables from the Run Configuration window.
Database
Microsoft Azure has a PaaS option for Postgres. This is a great option for Django applications, because:
- It comes with built-in backup functionality
- You don’t need to worry about deploying a database server
- The security can be managed from the Azure Portal
To deploy using my ARM template, use this command in the demo repository:
az deployment group create \
  --resource-group your_resource_group \
  --template-file .arm-templates/db/template.json \
  --parameters server_name='mydatabase' region_code='southeastasia'
Once this is setup, you will want to go through the security policies. The security policies for Postgres can’t (or won’t) be exported to ARM at the moment. I don’t really understand why, so here are the things I would check before proceeding:
| Configuration Area | Setting | Recommended Value | Purpose |
|---|---|---|---|
| Settings -> Connection Security | Firewall Rule | … | Configure web service IP |
| Settings -> Connection Security | Allow Access to Azure Services | No | Removes Azure IP acesss and requires private endpoint connections |
| Settings -> Connection Security | SSL Settings - Enforce SSL connection | Enabled | Blocks plain-text connection |
| Security -> Advanced Thread Protection | Advanced Threat Protection | On | Monitors the logs for unusual activity |
I’m recommending against Allow Access to Azure Services because it doesn’t just apply to IPs in your tenant, it applies to IPs in any tenant. Having this enabled (which is the default) means any server deployed on Azure, no matter who it belongs to can connect to your database if they know the password.
The downside of disabling this is that you need to use the Layer 7 firewall built into Postgres and specify the IP address of every client you want to allow connections from. This needs to include the Web Applications that you create.
(Optional) Using Private VNETS
An alternative deployment model is to create a private VNET just for your database connections and add a private endpoint to the database server. At the time of writing, the Azure Web Applications for Linux support for Private Endpoint Connections is experimental and when trying to set it up, I hit a number of major issues.
If you want to have auto-scaling, then manually adding an Allow rule for each deployment isn’t going to work, so this would be the preferred deployment model.
Creating the database
Something really important to note that isn’t specific to Azure is that Django will not create the database in Postgres automatically like it does with SQLite.
Before you can run your database migrations you will need to create a new database. Use psql or a Postgres client to create the application database.
If you followed my advice about using named Client IPs only to connect to Postgres, you will need to add a rule on the Postgres instance for your local IP address.
Configuring Django
With the initial database deployed, you can now configure Django to use the Postgresql service. This requires an additional package in your virtual environment, psycopg2.
Install the psycopg2-binary package to add support.
For local development, you can choose to either use SQLite or use the Postgres server in Azure, or install one locally.
Something important to consider is the testing and CI/CD pipeline, and for that reason I recommend sticking with two environments, Postgres for Staging and Production, and SQLite for development and testing.
To accomplish this, we’re going to use environment variables to configure Django because you should never put passwords in settings.py files. This has another benefit that environment variables are really simple to setup in Azure Web Apps.
These are the environment variables our app will use for databases:
| Category | Variable | Purpose |
|---|---|---|
| Database | DJANGO_DATABASE_PASSWORD |
Postgres login password |
| Database | DJANGO_DATABASE_NAME |
Postgres database name |
| Database | DJANGO_DATABASE_USER |
Postgres login username |
| Database | DJANGO_DATABASE_SERVER |
Postgres server hostname |
Your settings.py file should now have two database options, one for Staging/Production, and another for CI/CD:
import os

...

if 'DJANGO_DATABASE_PASSWORD' in os.environ.keys():
    # Staging or production database
    DATABASES = {
        'default': {
            'ENGINE': 'django.db.backends.postgresql',
            'NAME': os.environ['DJANGO_DATABASE_NAME'],
            'USER': os.environ['DJANGO_DATABASE_USER'],
            'PASSWORD': os.environ['DJANGO_DATABASE_PASSWORD'],
            'HOST': os.environ['DJANGO_DATABASE_SERVER'],
            'PORT': '5432',
            'OPTIONS': {
                'sslmode': 'require',
            },
        }
    }
    CACHES = {
        'default': {
            'BACKEND': 'django.core.cache.backends.db.DatabaseCache',
            'LOCATION': 'cache_table',
        }
    }
else:
    # development database
    DATABASES = {
        'default': {
            'ENGINE': 'django.db.backends.sqlite3',
            'NAME': os.path.join(BASE_DIR, 'db.sqlite3'),
        }
    }
    CACHES = {
        'default': {
            'BACKEND': 'django.core.cache.backends.dummy.DummyCache',
        }
    }
Caching on Postgres
In the Staging/Production branch, I’ve enabled database-caching for Django. Postgres on Azure is fast, low-latency and well-indexed- its an ideal alternative to REDIS.
To enable caching, add 'django.middleware.cache.UpdateCacheMiddleware', and 'django.middleware.cache.FetchFromCacheMiddleware' to your MIDDLEWARE list.
Then, similar to the database setup have a configuration branch for production and a configuration branch for development and test. The development branch will use DummyCache, which is what you want for local development:
MIDDLEWARE = [
    'django.middleware.security.SecurityMiddleware',
    'django.middleware.cache.UpdateCacheMiddleware',
    'django.middleware.common.CommonMiddleware',
    'django.middleware.cache.FetchFromCacheMiddleware',
    'django.contrib.sessions.middleware.SessionMiddleware',
    ...
]

...

if 'DJANGO_DATABASE_PASSWORD' in os.environ.keys():
    CACHES = {
        'default': {
            'BACKEND': 'django.core.cache.backends.db.DatabaseCache',
            'LOCATION': 'cache_table',
        }
    }
else:
    CACHES = {
        'default': {
            'BACKEND': 'django.core.cache.backends.dummy.DummyCache',
        }
    }
After configuring caching, run python manage.py createcachetable to create the cache table, making sure you have the database environment variables set on your console (otherwise this does nothing).
Running migrations
To run database migrations, you need to run the python manage.py migrate command, but with the correct environment variables configured, or it will just update SQLite.
Static files and media files
The tutorials for Django on Azure encourage using the Whitenoise static files app. This is great to get started with, but it puts a lot of load onto the Web App container. Because you have a limited number of connections per-container, you want to move the delivery of static and media files onto a dedicated endpoint.
Azure offers the services for this, called Azure Storage. Azure Storage can host “blobs”, like images, CSS and JavaScript files and deliver them to your users over HTTP. You can also add an Azure CDN endpoint (which I strongly recommend) to cache those assets in numerous geographic locations.
To get started, you need to:
- Create an Azure Storage account and configure two containers named
'static'and'media'. - Set the permission levels of those containers to
Blob. - Get a storage access key from
Storage Account > (your account) > Settings > Access keys > key1 > key.
Then you can configure your application to use the new storage containers. I’ve been using the django-storages extension because it has support for Azure Storage and can also upload the files for you.
Because Azure Web Apps will run manage.py collectstatic on deployment, you will notice deployments take significantly longer after configuring this step.
- Install
django-storages[azure]into your virtual environment and add it to yourrequirements.txtfile - Add
'storages'to the list ofINSTALLED_APPS - Create a
backendmodule inside your application and define two (or more) classes for static and media files
There are plenty of options for the AzureStorage class, check them out at the plugin documentation.
I recommend something simple to start with, a class for static files and a class for media files.
from django.conf import settings
from storages.backends.azure_storage import AzureStorage


class AzureMediaStorage(AzureStorage):
    account_name = settings.AZURE_ACCOUNT_NAME
    account_key = settings.AZURE_STORAGE_KEY
    azure_container = settings.AZURE_MEDIA_CONTAINER
    expiration_secs = None
    overwrite_files = True


class AzureStaticStorage(AzureStorage):
    account_name = settings.AZURE_ACCOUNT_NAME
    account_key = settings.AZURE_STORAGE_KEY
    azure_container = settings.AZURE_STATIC_CONTAINER
    expiration_secs = None
Next, in settings.py configure the default media storage (DEFAULT_FILE_STORAGE) and static files storage to the Azure Storage containers.
Again, we’re going to use environment variables, one for the storage key and another for the container names:
| Category | Variable | Purpose | Required (Dev) | Required (Production) | Default Value |
|---|---|---|---|---|---|
| Azure Storage | AZURE_STORAGE_KEY |
Azure Blob Storage API Key | No | Yes | False |
| Azure Storage | AZURE_MEDIA_CONTAINER |
Azure Storage Container name for media files | No | Yes | media |
| Azure Storage | AZURE_STATIC_CONTAINER |
Azure Storage Container name for static files | No | Yes | static |
You need to get a storage access key from Storage Account > (your account) > Settings > Access keys > key1 > key.
Set the value of this key to the environment variable 'AZURE_STORAGE_NAME'.
If you want to have separate media or static containers between production and development/test, you can use environment variables to accomplish this.
Next, update settings.py to reflect the new setup:
DEFAULT_FILE_STORAGE = 'django_on_azure.backend.AzureMediaStorage'
STATICFILES_STORAGE  = 'django_on_azure.backend.AzureStaticStorage'

AZURE_STORAGE_KEY = os.environ.get('AZURE_STORAGE_KEY', False)
AZURE_ACCOUNT_NAME = "demo"  # your account name
AZURE_MEDIA_CONTAINER = os.environ.get('AZURE_MEDIA_CONTAINER', 'media')
AZURE_STATIC_CONTAINER = os.environ.get('AZURE_STATIC_CONTAINER', 'static')

# AZURE_CUSTOM_DOMAIN = f'{AZURE_ACCOUNT_NAME}.azureedge.net'  # CDN URL
AZURE_CUSTOM_DOMAIN = f'{AZURE_ACCOUNT_NAME}.blob.core.windows.net'  # Files URL

STATIC_URL = f'https://{AZURE_CUSTOM_DOMAIN}/{AZURE_STATIC_CONTAINER}/'
MEDIA_URL = f'https://{AZURE_CUSTOM_DOMAIN}/{AZURE_MEDIA_CONTAINER}/'

STATIC_ROOT = os.path.join(BASE_DIR, 'staticfiles')
# any static paths you want to publish
STATICFILES_DIRS = [
    os.path.join(BASE_DIR, 'demo', 'static')
]
There are two options for deployment, using the Azure Storage containers default HTTP/HTTPS endpoint, or using an Azure CDN Caching endpoint.
I strongly recommend setting up a CDN endpoint as it will dramatically improve performance for your users. To create an endpoint, Storage Account > (your account) > Blob service > Azure CDN > New Endpoint.
In settings.py, change the AZURE_CUSTOM_DOMAIN to the .azureedge.net URL (default), or if you configured a custom URL, put this URL in here:
AZURE_CUSTOM_DOMAIN = f'{AZURE_ACCOUNT_NAME}.azureedge.net' # CDN URL
Now that you’ve configured everything, its time to test this out and run collectstatic. This task will collect all the static files and upload them to the container.
One additional thing to note is that when you use the Azure CDN, it will cache assets by default. If you’ve changed your assets (e.g. a CSS file), you will always see the cached asset.
I recommend configuring a global rule to bypass the cache when the Cache-Control is no-cache:
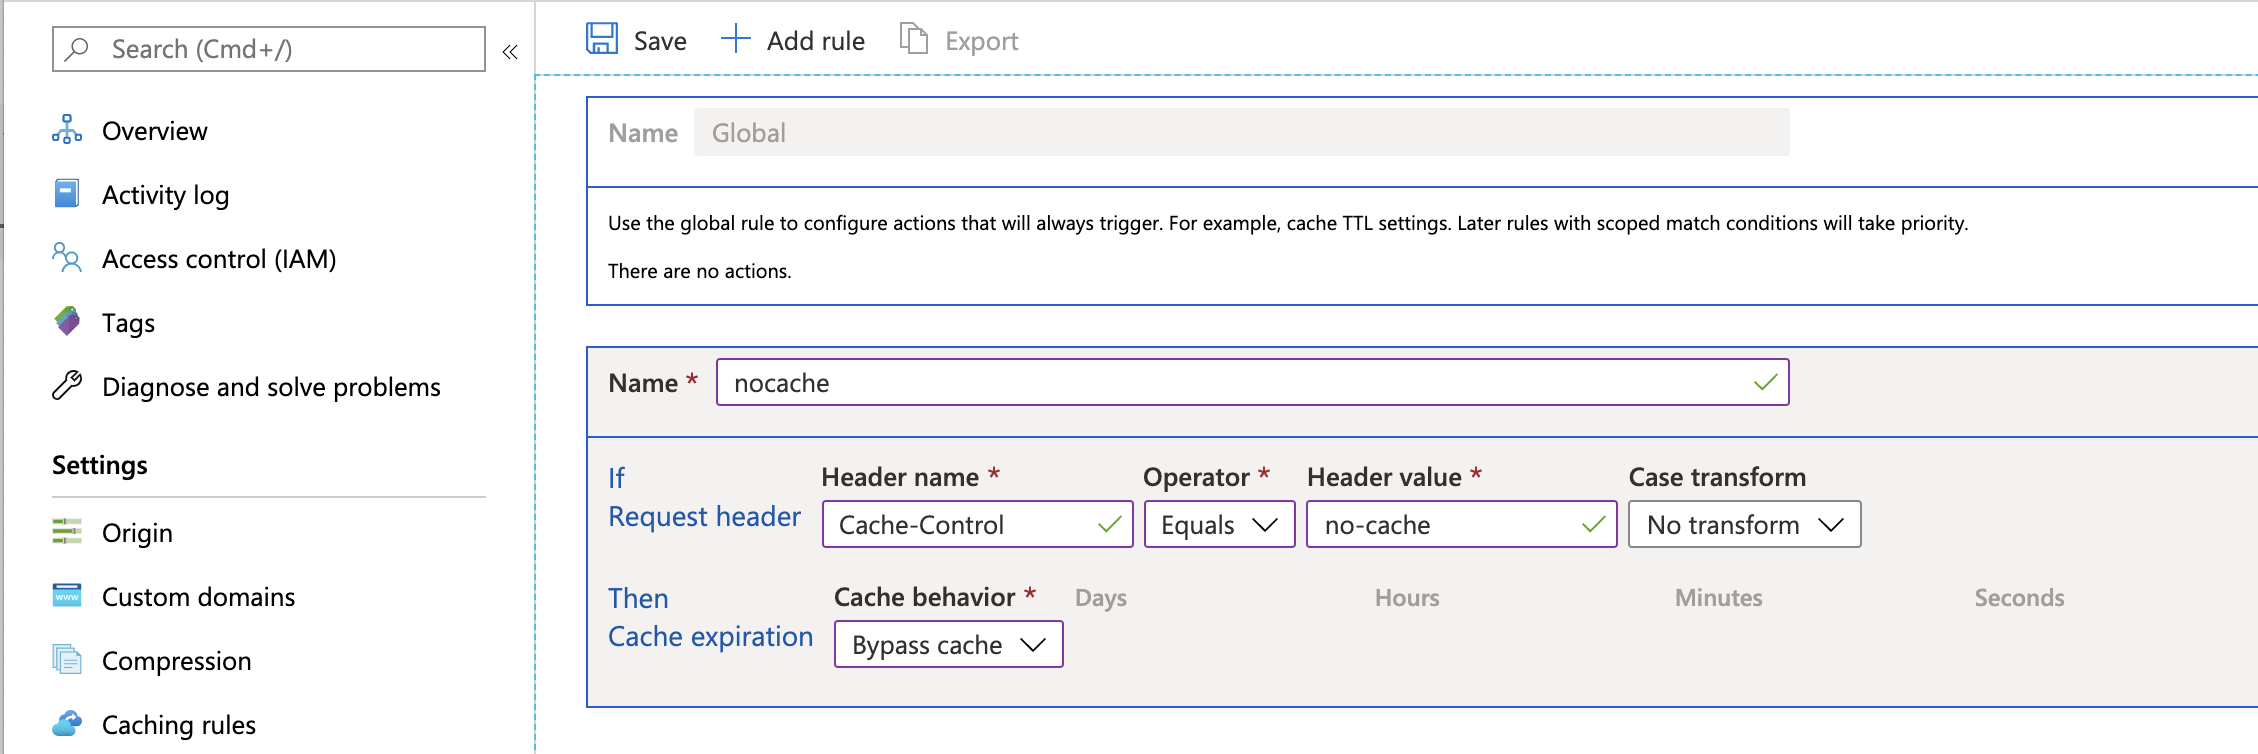
With this enabled, when you do a hard refresh in a browser, it will show the latest version from the Azure Storage container.
Testing
There are many considerations when thinking about testing. I’m going to cover some of the specifics to Django.
If you’re new to testing, then read my article on Python Testing before continuing.
Let’s make sure that:
- The environments are reproducible so a test-pass in development should mean a test-pass on staging and production
- You can run unit tests and integration tests
- You can test the performance and security of the application
We will come to security and performance later in this article, so lets first start with creating tests.
Integration Testing with Django and Pytest
Pytest has an amazing plugin for testing Django. In the demo application, I’ve provided some example fixtures to get you started with integration tests.
I encourage integration tests to be in a separate directory to unit tests, since they often come with different fixtures.
One of the fixtures will load any data from tests/data/test.json. This is ideal if you want to load a backup of your database before running the tests.
To create a JSON backup, run the command python manage.py dumpdata > tests/data/test.json.
import pytest
from django.core.management import call_command


@pytest.fixture(scope='session')
def django_db_setup(django_db_setup, django_db_blocker):
    with django_db_blocker.unblock():
        call_command('loaddata', 'tests/data/test.json')
Another example fixture is the user_client fixture which extends the client fixture but creates a user and authenticates using that user first:
import pytest

@pytest.fixture
def user_client(client, django_user_model):
    username = "user1"
    _pw = "barbarblacksheep"
    django_user_model.objects.create_user(username=username, password=_pw)
    client.login(username=username, password=_pw)
    return client
You can use these fixtures to make requests to the application and check the response data, or the response type.
For example, you might want to check that anonymous users cannot see the products/ routes:
from django.http import HttpResponseRedirect, HttpResponseForbidden, HttpResponse
import pytest


ANON_VIEWS_CHECK = [
    '/products/',
    '/products/1'
]


@pytest.mark.parametrize('path', ANON_VIEWS_CHECK)
@pytest.mark.django_db
def test_anonymous_categories_redirects_to_login(client, path):
    response = client.get(path)
    assert isinstance(response, HttpResponseRedirect)
    assert response.url.startswith("/login")
Then you could test using the user_client fixture to see the same routes and verify the results:
USERS_ALLOWED = [
    '/products/',
    '/products/1'
]


@pytest.mark.parametrize('path', USERS_ALLOWED)
@pytest.mark.django_db
def test_users_allowed(user_client, path):
    response = user_client.get(path)
    assert isinstance(response, HttpResponse)
    assert response.status_code == 200
    assert "cheese" in response.content
Reproducable Environment Testing
In the test cycle, its going to be really important that the environments are as identical-as-possible. For example, if you develop locally on Python 3.8, and you test on Python 3.8 locally, but your production environment is Python 3.7 you are going to later run into bugs that happen in production but don’t happen on test.
We have deployed Python 3.7 for staging and production, so your Virtual Environment should also be Python 3.7.
To make sure you can test locally, with a clean environment each time, you can use tox. To install tox run pip install tox and create a configuration file, tox.ini in your project root:
[tox]
skipsdist=True
envlist = py37, lint

[testenv]
deps = -rrequirements-test.txt
commands = python -m pytest

[testenv:lint]
deps =
    -rrequirements-dev.txt

commands =
    flake8 demo
This file will run the pinned version of django and the requirements for testing, then run pytest.
Because Django is updated regularly, and you should update to the latest version if it fixes bugs or security holes, you can use Tox to automatically check that the latest version doesn’t break your application by adding a second environment and updating django before it runs:
[tox]
skipsdist=True
envlist = py37, py37-latest lint

[testenv]
deps = -rrequirements-test.txt
commands =
    python -m pytest
    latest: pip install --upgrade django

[testenv:lint]
deps =
    -rrequirements-dev.txt

commands =
    flake8 demo
Continuous Testing and Deployment
To run the tests automatically, I recommend adding a git repository and configuring a CI/CD service like Azure Pipelines or GitHub actions.
Continuous Testing and Deployment with GitHub actions
To deploy from GitHub, you need to download the Publish Profile (which contains the publish password):
- In the staging applicationm, go to
Deployment > Deployment Center > Deployment Credentials > Get Publish Profileand download the.PublishSettingsfile. Open it in a text editor and copy the contents. - In your GitHub repository, select
Settings > Secrets > Add a new secretnamedSTAGING_PUBLISH_PROFILE - Paste in the contents of the downloaded
.PublishSettingsfile - Save the secret
Next, create a GitHub actions workflow, this is the simplest to start with, it will run your tests, check the security and then deploy to staging.
By default, GitHub will suggest a workflow that is triggered on pull requests. You do not want this, because it would deploy any pull-request to the master branch into your staging environment!
Instead a simple workflow that only happens on push to master:
name: Django CI

on:
  push:
    branches: [ master ]

env:
  AZURE_WEBAPP_NAME: app-staging

jobs:
  build:

    runs-on: ubuntu-latest
    strategy:
      max-parallel: 4
      matrix:
        python-version: [3.7]

    steps:
    - uses: actions/checkout@v2
    - name: Set up Python ${{ matrix.python-version }}
      uses: actions/setup-python@v1
      with:
        python-version: ${{ matrix.python-version }}
    - name: Install Dependencies
      run: |
        python -m pip install --upgrade pip
        pip install -r requirements.txt
    - name: Run Tests
      run: |
        python manage.py test
    - name: Python Security Scanner
      uses: tonybaloney/pycharm-security@1.15.1
      with:
        path: 'demo'
    - name: 'Deploy to Azure WebApp'
      uses: azure/webapps-deploy@v2
      with:
        app-name: ${{ env.AZURE_WEBAPP_NAME }}
        publish-profile: ${{ secrets.STAGING_PUBLISH_PROFILE }}
For production, I would recommend having a release branch and then merging changes into it when you are ready to release them. Download the production publish profile and create another secret key in GitHub (PRODUCTION_PUBLISH_PROFILE).
You can create a second workflow to release to production from this branch:
on:
  push:
    branches: [ release ]

env:
  AZURE_WEBAPP_NAME: app-production

  jobs:
  build:

 runs-on: ubuntu-latest
    strategy:
      max-parallel: 4
      matrix:
        python-version: [3.7]

    steps:
    - uses: actions/checkout@v2
    - name: Set up Python ${{ matrix.python-version }}
      uses: actions/setup-python@v1
      with:
        python-version: ${{ matrix.python-version }}
    - name: Install Dependencies
      run: |
        python -m pip install --upgrade pip
        pip install -r requirements.txt
    - name: Run Tests
      run: |
        python manage.py test
    - name: Python Security Scanner
      uses: tonybaloney/pycharm-security@1.15.1
      with:
        path: 'demo'
    - name: 'Deploy to Azure WebApp'
      uses: azure/webapps-deploy@v2
      with:
        app-name: ${{ env.AZURE_WEBAPP_NAME }}
        publish-profile: ${{ secrets.PRODUCTION_PUBLISH_PROFILE }}
Continuous Testing with Azure Pipelines
On the Project Settings page, select Pipelines > Service connections, then select New service connection, and then select Azure Resource Manager from the dropdown.
In the Add an Azure Resource Manager service connection dialog box:
- Give the connection a name. Make note of the name to use later in the pipeline.
- For Scope level, select Subscription.
- Select the subscription for your App Service from the Subscription drop-down list.
- Under Resource Group, select your resource group from the dropdown.
- Make sure the option Allow all pipelines to use this connection is selected, and then select OK.
For the pipeline, I recommend the following steps:
- Change the project path to the location of manage.py
- Install the project depedencies and test dependencies
- Compile your languages (optional, if you don’t have multilingual support)
- Deploy to your staging environment
I recommend adding pytest-azurepipelines as it will automatically publish the Pytest test results into the Azure Test UI.
trigger:
- master

pool:
  vmImage: 'ubuntu-latest'
strategy:
  matrix:
    Python37:
      PYTHON_VERSION: '3.7'
  maxParallel: 3

steps:
- task: UsePythonVersion@0
  inputs:
    versionSpec: '$(PYTHON_VERSION)'
    architecture: 'x64'

- task: PythonScript@0
  displayName: 'Export project path'
  inputs:
    scriptSource: 'inline'
    script: |
      """Search all subdirectories for `manage.py`."""
      from glob import iglob
      from os import path
      # Python >= 3.5
      manage_py = next(iglob(path.join('**', 'manage.py'), recursive=True), None)
      if not manage_py:
          raise SystemExit('Could not find a Django project')
      project_location = path.dirname(path.abspath(manage_py))
      print('Found Django project in', project_location)
      print('##vso[task.setvariable variable=projectRoot]{}'.format(project_location))

- script: |
    python -m pip install --upgrade pip setuptools wheel
    pip install -r requirements.txt
    pip install -r requirements-test.txt
    sudo apt-get install -y gettext
  displayName: 'Install prerequisites'

- script: |
    python manage.py compilemessages --ignore venv
  displayName: 'Compile languages'

- script: |
    python -m pytest --cov=your_app --cov-report=xml
  displayName: 'Run tests'

- task: AzureRmWebAppDeployment@4
  displayName: 'Deploy to Staging'
  inputs:
    ConnectionType: 'AzureRM'
    azureSubscription: 'Your Connection Name'
    appType: 'webAppLinux'
    WebAppName: 'app-staging'
    packageForLinux: '$(System.DefaultWorkingDirectory)/'
    RuntimeStack: 'PYTHON|3.7'
    AppSettings: '-SCM_DO_BUILD_DURING_DEPLOYMENT 1'
Then, for a release environment you can clone this pipeline and change the trigger branch and the target web app.
Security
There are many things you need to consider for the security of your deployed application:
- Check the Django security models are applying in your views
- Check that you don’t have any insecured views that share sensitive data
- Check that you don’t have insecure versions of packages running on the server
- Check that the environment is secured correctly
- Check that the SSL certificate is correctly configured
- Check that your code doesn’t contain vulnerabilities that expose data
Not all of this is in scope for this article, but I do strongly recommend using my Python Security scanner to look for Django-related issues in particular.
This plugin allows for detection and warning of the security advice and best-practices for the Django framework, including:
- Scanning and warning of insecure versions of Django
- Scanning and warning of insecure versions for over 80 Django extensions
- Lexing and scanning of Django SQL templates to detect for bypassing of Django’s SQL injection protection
- Scanning of QuerySets and filter methods for potential SQL injection flaws
- Scanning of RawSql APIs for potential SQL injection flaws
- Scanning and warning of your settings.py for poor security practices
- Detection and warning of Cross-Site-Scripting (XSS) bypassing
- Over 100 other best-practice and general Python security checks
In the GitHub actions workflow I’ve showed how to statically analyse the project code using the GitHub action, but this won’t inspect the package versions.
You can run the package inspection from inside PyCharm, or use an external service like snyk.
Performance
With the staging environment, you can test the performance of your application and try adjusting your queries, caching and Gunicorn setup.
One of the easiest ways to test the environment is to use locust. You can add locust to your virtual environment and create a simple locust script, called locustfile.py inside the tests directory.
from locust import HttpLocust, TaskSet, task, between


class WebsiteTasks(TaskSet):
    def on_start(self):
        pass

    @task
    def index(self):
        self.client.get("/")


class WebsiteUser(HttpLocust):
    task_set = WebsiteTasks
    wait_time = between(5, 15)
This task will make a request to the / URL of the target server.
To start locust, run locust on the command line from the directory containing the locustfile.py.
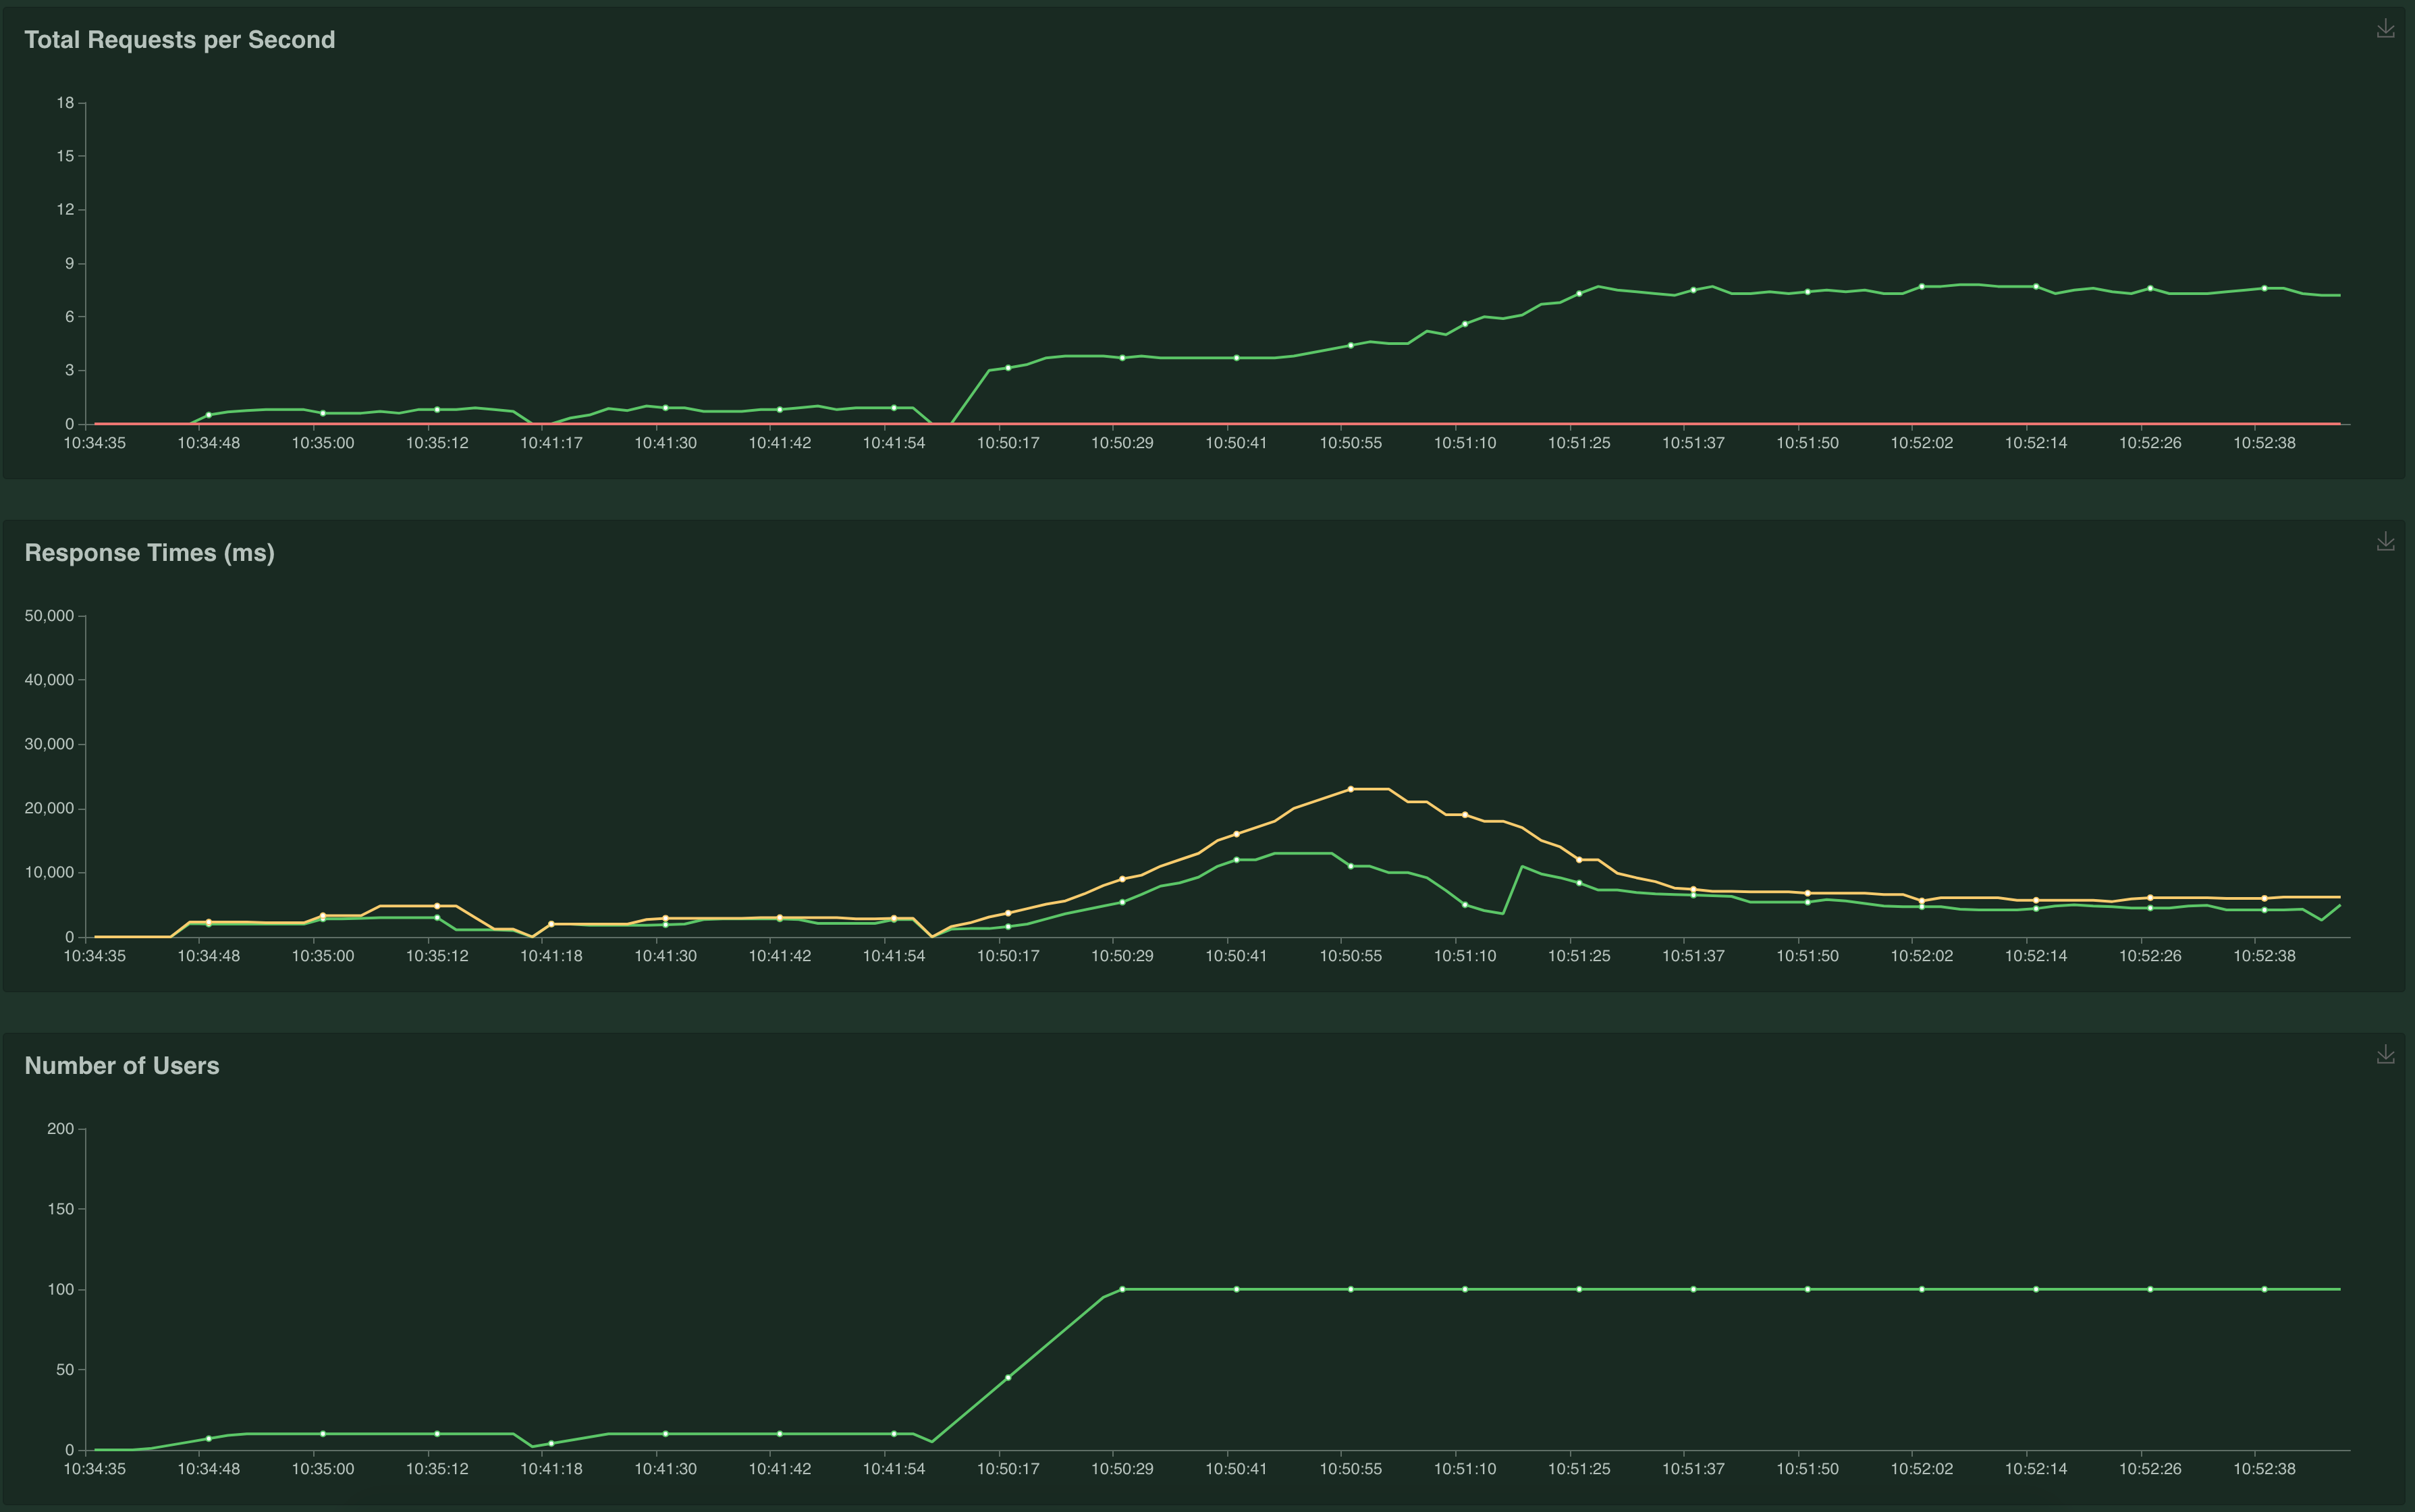
This will start up a web server at http://localhost:8089/ with the locust application. Start a new test and set:
- Total number of users to 100
- The hatch rate as 1
- The host as
https://your-website.azurewebsites.net, or your custom domain
Once you have the test running, you can see the results in realtime:
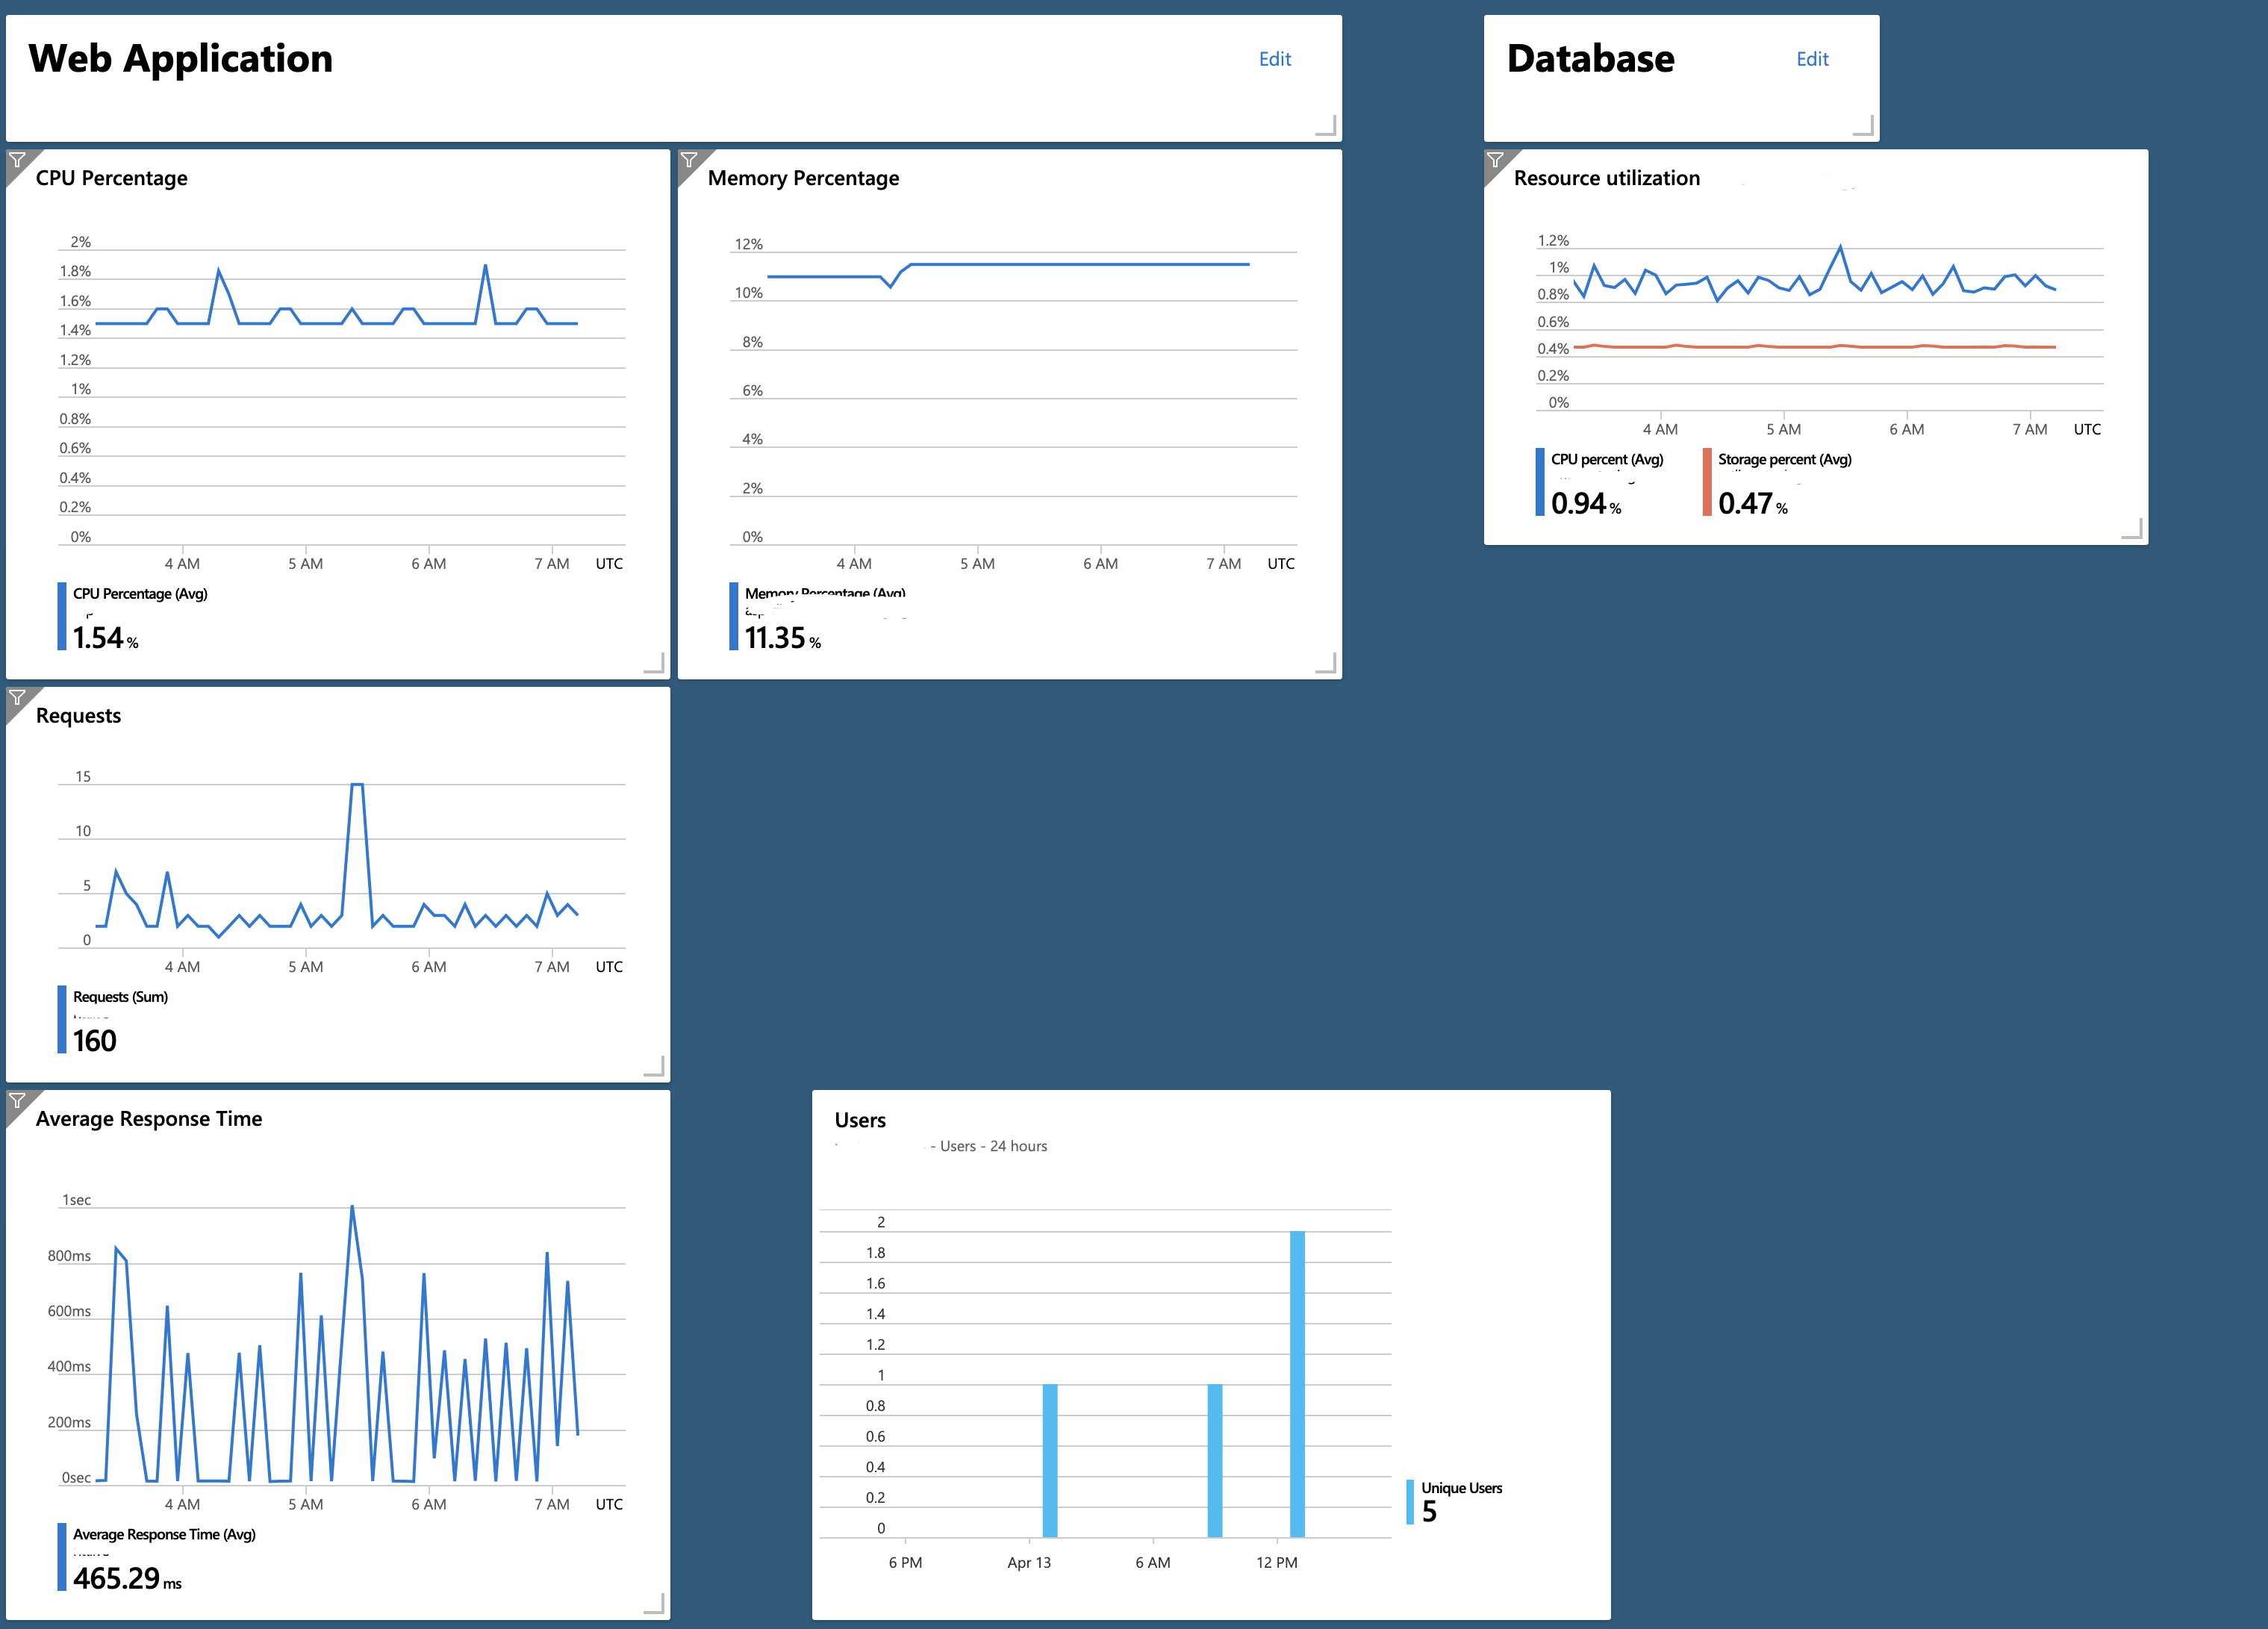
I recommend now creating a dashboard in Azure to inspect the CPU, Memory, Response time and Database load to inspect bottlenecks.
Monitoring
Azure comes with a Dashboarding feature, so with your performance tests setup, you can start to add some metrics across your new applicaiton.
I recommend the following:
- App Plan - CPU Utilization
- App Plan - Memory Utilization
- Web App - Requests
- Web App - Response Time
- Database - Resource Utilization
This will produce a useful dashboard for seeing the responsiveness of your application, whether you need to scale-up or down and how your database is performing:
Exception Handling with Insights
Microsoft Azure has a monitoring service called Application Insights that has SDKs for both Python and JavaScript.
Once you have created an Application Insights service inside your Azure tenant, you can configure Django handle exceptions by sending them to Insights.
- Add
applicationinsightsto your release dependencies - Get the Instrumentation Key from the Insights dashboard
- Add the
'applicationinsights.django.ApplicationInsightsMiddleware'middleware - Add an
APPLICATION_INSIGHTSarea to your settings with the instrumentation key loaded from an environment variable - Set the
LOGGINGproperties to send data to application insights when debug mode is disabled
Having this enabled during development would create a lot of noise, so this example only changes the logging properties when debug mode is disabled:
# If on Django >= 1.10
MIDDLEWARE = [
    ...
    'applicationinsights.django.ApplicationInsightsMiddleware'
]

APPLICATION_INSIGHTS = {
    # Your Application Insights instrumentation key
    'ikey': os.environ.get('INSIGHTS_KEY', "00000000-0000-0000-0000-000000000000"),

    # (optional) By default, request names are logged as the request method
    # and relative path of the URL.  To log the fully-qualified view names
    # instead, set this to True.  Defaults to False.
    'use_view_name': True,

    # (optional) To log arguments passed into the views as custom properties,
    # set this to True.  Defaults to False.
    'record_view_arguments': True,
}
if not DEBUG:
    LOGGING = {
        'version': 1,
        'disable_existing_loggers': False,
        'handlers': {
            # The application insights handler is here
            'appinsights': {
                'class': 'applicationinsights.django.LoggingHandler',
                'level': 'WARNING'
            }
        },
        'loggers': {
            'django': {
                'handlers': ['appinsights'],
                'level': 'WARNING',
                'propagate': True,
            }
        }
    }
Once this is done, you can configure alerts from the Insights portal to notify you when your application crashes.
I recommend adding Application Insights to your base template, which you can do by generating the embed code from the Insights portal.
Conclusion
Microsoft Azure makes a great platform for hosting Django applications in production. You have databases, monitoring, exception handling and automated-deployments all in one place.
Related Posts