In this tutorial, I’ll show you -by example- how to use Azure Pipelines to automate the testing, validation, and publishing of your Python projects.
Azure Pipelines is a cloud service that supports many environments, languages, and tools. It is configured via a master azure-pipelines.yml YAML file within your project.
Your project can exist in multiple source repositories, and automated integrations are available for GitHub.
If you want to see the project layouts and how the configuration looks, everything in this tutorial is on my GitHub repository. It’s licensed as MIT, so you can do with it as you wish!
The Azure Pipeline Build
A build can have multiple jobs. You might want to segment your jobs by tasks like:
- Build
- Deploy
- Install
In these examples, I’ve focused on testing. Because Python is an interpreted language, the build stage is typically replaced with dynamic and static checkers, known as ‘linters’.
Having automated tests for any Python project can give you fast notifications when a change to the code has broken an existing feature in your application.
Your azure pipelines build will consist of jobs, these jobs consist of a number of steps. Some steps are pre-defined and called “Tasks”, you can find the full list on the Microsoft Azure Pipelines website.
You can also define your own tasks consisting of scripts in either Bash (Linux and MacOS) or PowerShell (Windows).
Some of the pre-defined tasks you’ll need for Python are:
UsePythonVersion@0 — Use a specific Python version (like a virtual environment)
PublishTestResults@2 — Publish the test results to the dashboard. Test results should be in the Junit XML format.
Selecting an Operating System
When configuring a job, you have to pick which Virtual Machine image to use for the job agent to execute your steps. For Linux, there are many images to choose from, Ubuntu 16 has the latest versions of Python available.
- job: 'your_job_name'
  pool:
    vmImage: 'Ubuntu-16.04'
To test on Windows, the best image to choose is the vs2017-win2016 image, which has Visual Studio 2017 on Windows Server 2016.
- job: 'your_job_name'
  pool:
    vmImage: 'vs2017-win2016'
Some of the other images include:
* macOS 10.13 (macOS-10.13)
* Windows Server 1803 (win1803) - for running Windows containers
* Visual Studio 2015 on Windows Server 2012R2 (vs2015-win2012r2)
Templating steps for re-use across jobs
Because steps are defined in a job, and a job can only have 1 operating system it can get very tedious to copy steps between jobs and keep the up to date.
If your build and test steps are the same across Linux and Windows, you can move the steps into a separate file (in this example, called templates/steps.yml) and include it in the job.
jobs:
- job: Build_Linux
  pool:
   vmImage: 'ubuntu-16.04'
  steps:
    - template: templates/steps.yml
- job: Build_Windows
  pool:
   vmImage: 'vs2017-win2016'
  steps:
    - template: templates/steps.yml
Test Output
Once you’ve configured your testing jobs to output a Junit XML file and you’ve successfully configured the PublishTestResults task, you will see a detailed test dashboard. All test failures will be available here. In the examples, I’ve named the Test Results based on the operating system, job name and the version of Python so it’s easier to see what’s happening. You can add any variable or label to the test names.

Testing a Django application
To test a Django application, there are 4 basic steps you need to add to a build job:
1. Choose the Python version.
This is important as Django can behave very differently between Python versions. This example tests Python 3.6 and 3.7. You can change these for other versions, like 3.5.
2. Install Django
The installation of Django would be via. pip . This script task updates the pip binary and then installs any dependencies in django-basic/requirements.txt, which is the example Django Project I’ve set up for this tutorial.
- script: |
    python -m pip install --upgrade pip
    pip install -r django-basic/requirements.txt
  displayName: 'Install dependencies'
3. Test your Django application
To test a Django application you can use the python manage.py test command, or use another tool like Pytest. Because Azure Pipelines test output can be viewed and sorted online, it’s beneficial to use the Junit XML output. Pytest is the easiest way to generate this. The pytest-django package is a plugin for Pytest that will work with your existing Django tests. You only need to make a small change. Create a pytest.ini file in your project directory with these settings:
[pytest]
python_files = tests.py test_*.py *_tests.py
DJANGO_SETTINGS_MODULE = your_module_name.settings
The task itself brings together these tools to test an application:
- script: |
   pip install pytest-django
   cd django-basic/azuredemo
   pytest --junitxml=../../reports/django-basic.xml
  displayName: 'Run tests'
4. Publish the test output
Lastly, use the builtin task to copy the test output to the Azure Pipelines service.
Here is the azure-pipelines.yml for the example Django app which can be found on GitHub.
trigger:
- master
jobs:
- job: 'django_basic'
  pool:
    vmImage: 'Ubuntu-16.04'
  strategy:
    matrix:
      Python36:
        python.version: '3.6'
      Python37:
        python.version: '3.7'
    maxParallel: 2
  steps:
  - task: UsePythonVersion@0
    inputs:
      versionSpec: '$(python.version)'
  - script: |
      python -m pip install --upgrade pip
      pip install -r django-basic/requirements.txt
    displayName: 'Install dependencies'
  - script: |
      pip install pytest-django
      cd django-basic/azuredemo
      pytest --junitxml=../../reports/django-basic.xml
    displayName: 'Run tests'
  - task: PublishTestResults@2
    inputs:
      testResultsFiles: 'reports/django-basic.xml'
      testRunTitle: '$(Agent.OS) - $(Build.DefinitionName) - Python $(python.version)'
    condition: succeededOrFailed()
A multi-environment Django test
If you want to test your Django application against multiple versions of Django, or a particular plugin, you can add extra version numbers as variables in the build matrix. In this example, I’m testing 2 versions of Django across 2 versions of Python. This generates multiple jobs automatically.
Because there is no built-in task for selecting the version of Django, we use the variable to control the version installed in pip. This script task adds the django.version variable defined in the matrix to the pip install command.
- script: |
   python -m pip install --upgrade pip
   pip install django==$(django.version)
  displayName: 'Install dependencies'
Here is the final azure-pipelines.yml for the matrixed Django test:
trigger:
- master
name: $(Date:yyyyMMdd)$(Rev:.r)
jobs:
 - job: 'django_multi_environment'
  pool:
    vmImage: 'Ubuntu-16.04'
  strategy:
    matrix:
      Python36_Django213:
        python.version: '3.6'
        django.version: '2.1.3'
      Python37_Django213:
        python.version: '3.7'
        django.version: '2.1.3'
      Python37_Django214:
        python.version: '3.7'
        django.version: '2.1.4'
    maxParallel: 3
  steps:
  - task: UsePythonVersion@0
    inputs:
      versionSpec: '$(python.version)'
  - script: |
      python -m pip install --upgrade pip
      pip install django==$(django.version)
    displayName: 'Install dependencies'
  - script: |
      pip install pytest-django
      cd django-multi-environment/azuredemo
      pytest --junitxml=../../reports/django-multi-environment.xml
    displayName: 'Run tests'
  - task: PublishTestResults@2
    inputs:
      testResultsFiles: 'reports/django-multi-environment.xml'
      testRunTitle: '$(Agent.OS) - $(Build.BuildNumber)[$(Agent.JobName)] - Python $(python.version) - Django $(django.version)'
    condition: succeededOrFailed()
A basic Flask test
If you’re using the Flask web framework, the steps are very similar to Django, but it doesn’t require a Pytest plugin.
In the example repository, I’ve simply copied the Flask example web application which comes with tests. To use this on Azure Pipelines, you need to run the setup.py command using pip install -e . from the application directory. Adding the [test] suffix will install the testing tools.
trigger:
- master
name: $(Date:yyyyMMdd)$(Rev:.r)
jobs:
 - job: 'flask_basic'
  pool:
    vmImage: 'Ubuntu-16.04'
  strategy:
    matrix:
      Python36:
        python.version: '3.6'
      Python37:
        python.version: '3.7'
    maxParallel: 2
  steps:
  - task: UsePythonVersion@0
    inputs:
      versionSpec: '$(python.version)'
  - script: |
      python -m pip install --upgrade pip
      cd flask-basic
      pip install '.[test]'
    displayName: 'Install dependencies'
  - script: |
      pip install pytest
      cd flask-basic
      pytest --junitxml=../reports/flask-basic.xml
    displayName: 'Run tests'
  - task: PublishTestResults@2
    inputs:
      testResultsFiles: 'reports/flask-basic.xml'
      testRunTitle: '$(Agent.OS) - $(Build.BuildNumber)[$(Agent.JobName)] - Python $(python.version)'
    condition: succeededOrFailed()
A Flask test with coverage
If you wanted to calculate the test coverage of your application, you combine the testing task with the coverage package.
For the flask-basic example project, you install both Pytest and coverage, then run pytest through the coverage run command.
- script: |
   pip install pytest coverage
   cd flask-basic
   coverage run -m pytest --junitxml=../reports/flask-basic-coverage.xml
   coverage report
  displayName: 'Run tests and coverage'
You will be able to view the coverage data in the Azure Pipelines portal.
trigger:
- master
name: $(Date:yyyyMMdd)$(Rev:.r)
jobs:
 - job: 'flask_basic_with_coverage'
  pool:
    vmImage: 'Ubuntu-16.04'
  strategy:
    matrix:
      Python36:
        python.version: '3.6'
      Python37:
        python.version: '3.7'
    maxParallel: 2
  steps:
  - task: UsePythonVersion@0
    inputs:
      versionSpec: '$(python.version)'
  - script: |
      python -m pip install --upgrade pip
      cd flask-basic
      pip install '.[test]'
    displayName: 'Install dependencies'
  - script: |
      pip install pytest coverage
      cd flask-basic
      coverage run -m pytest --junitxml=../reports/flask-basic-coverage.xml
      coverage report
    displayName: 'Run tests and coverage'
  - task: PublishTestResults@2
    inputs:
      testResultsFiles: 'reports/flask-basic-coverage.xml'
      testRunTitle: '$(Agent.OS) - $(Build.BuildNumber)[$(Agent.JobName)] - Python $(python.version)'
    condition: succeededOrFailed()
Testing a basic Python library
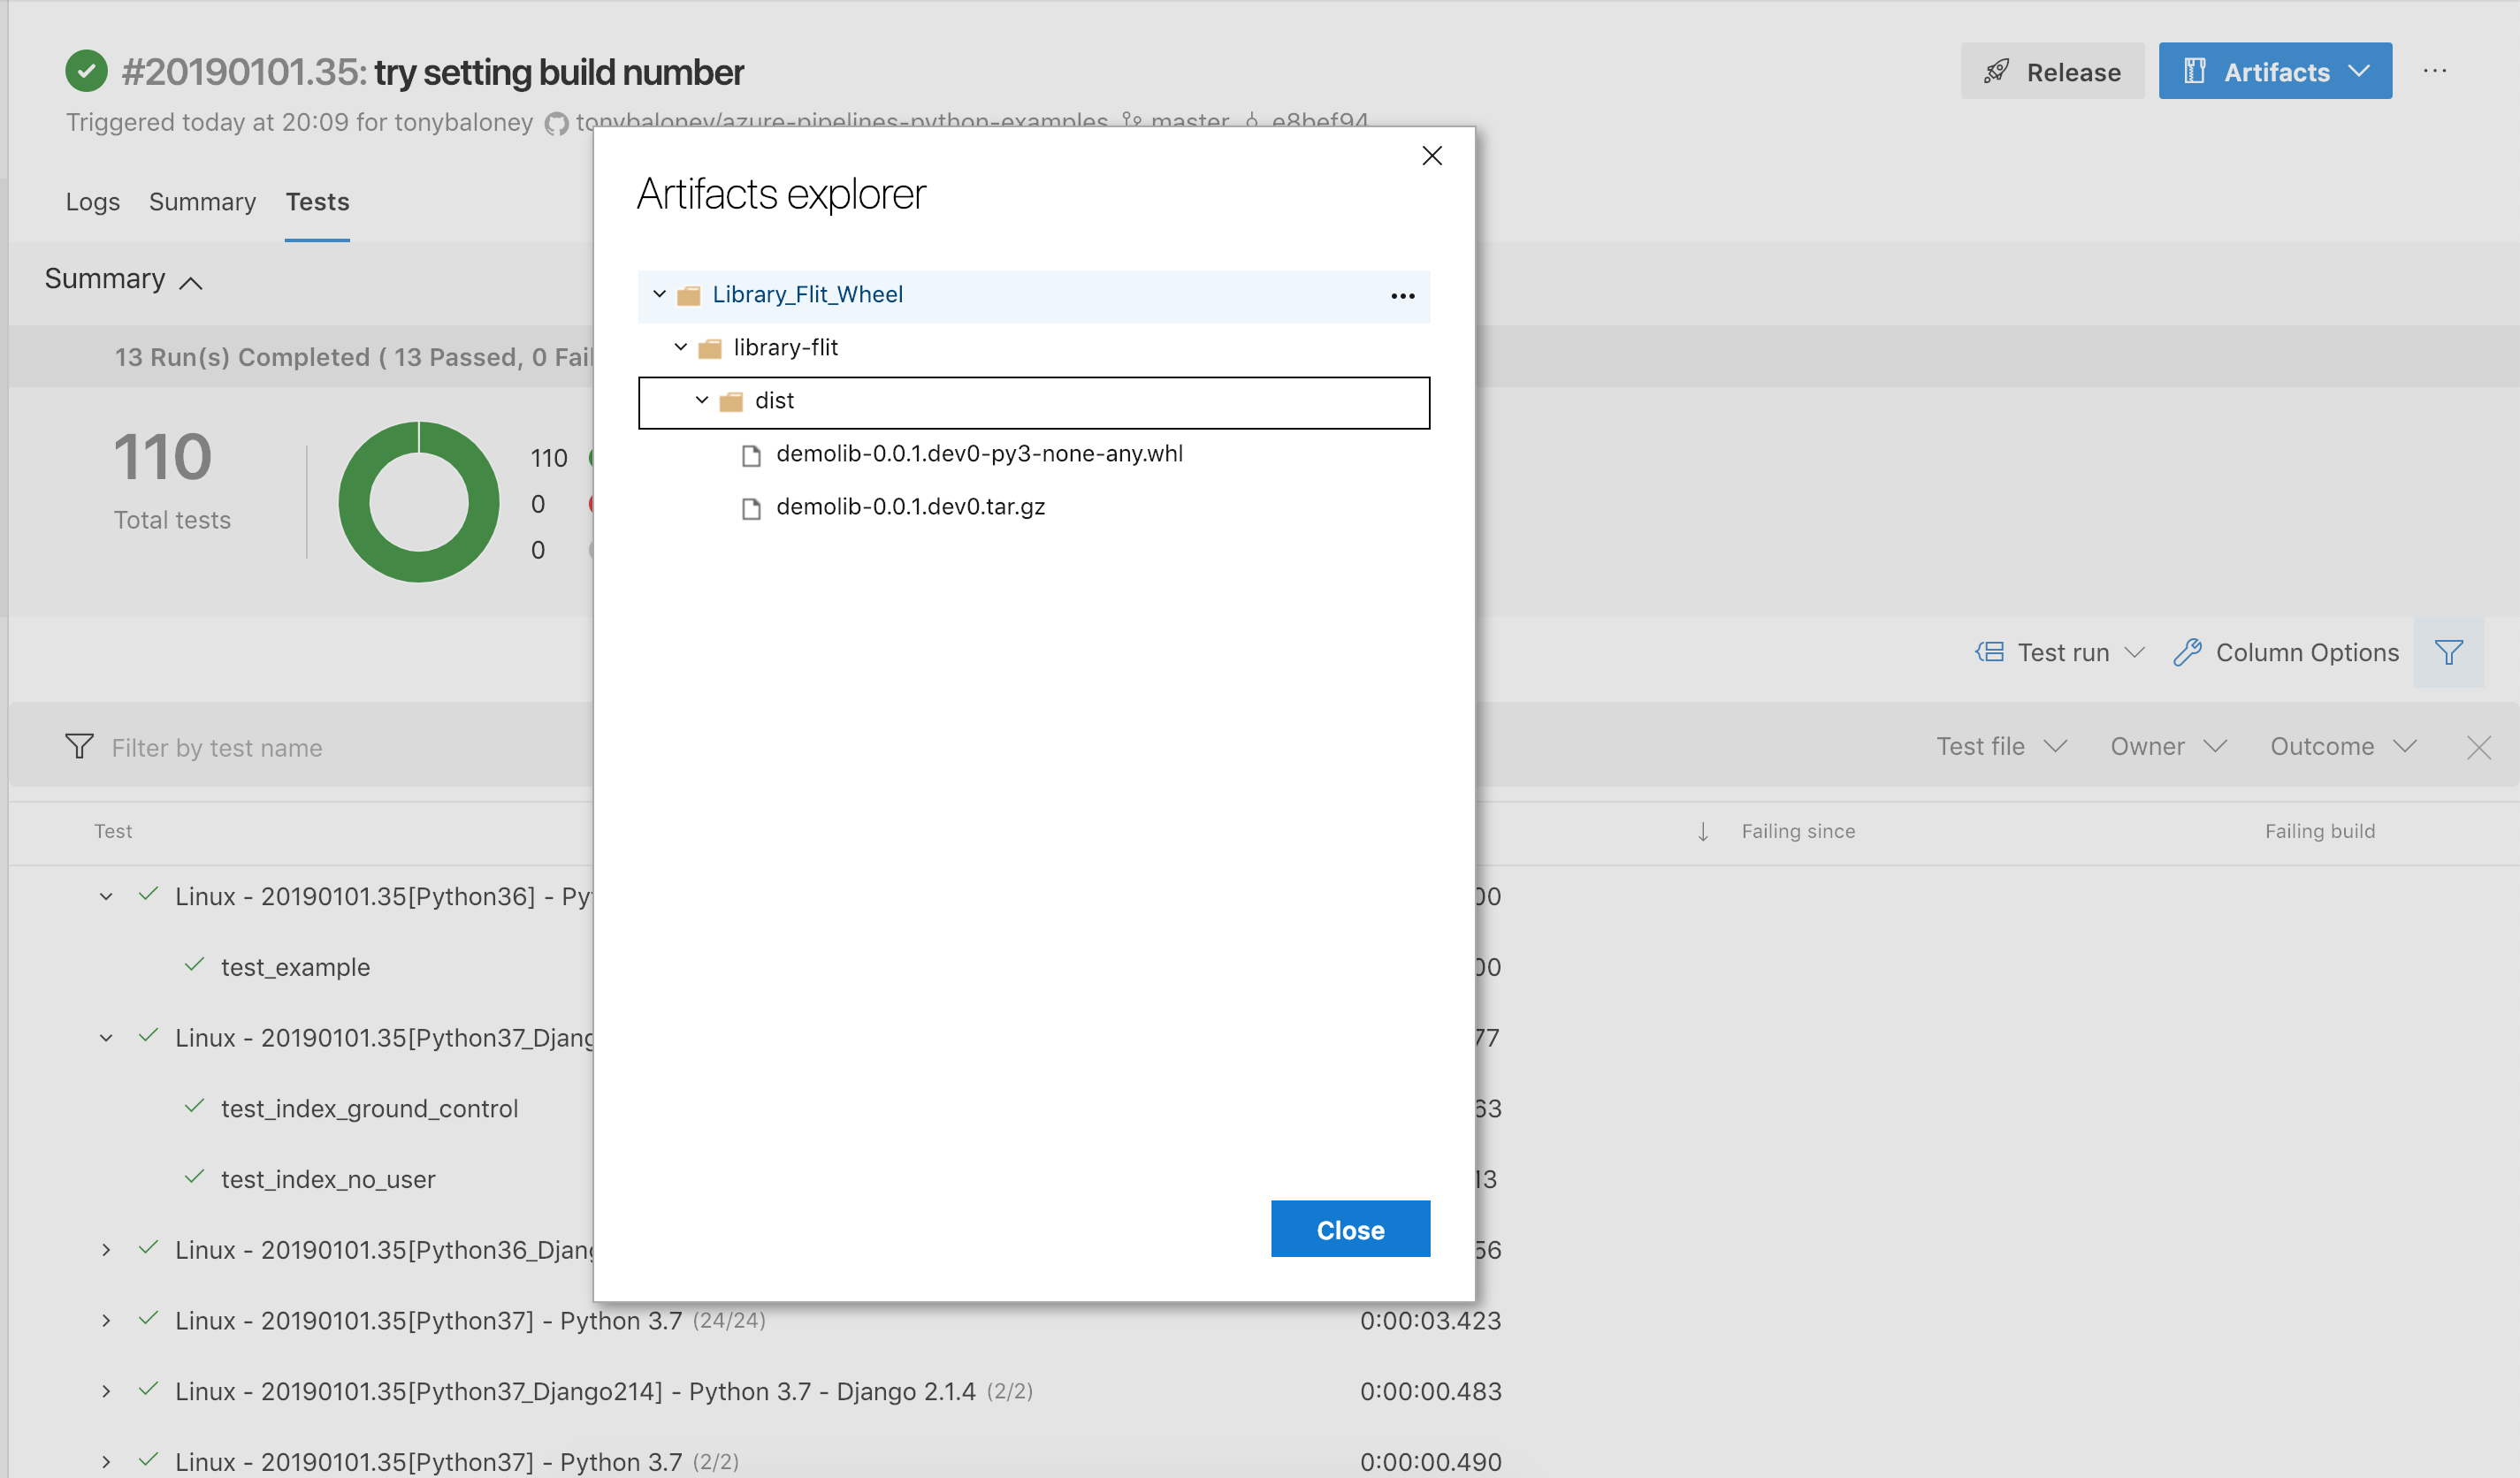
If you’re building Python libraries for distribution via shared files, PyPi or another artifact system, this example illustrates how to build source and binary distributions on Azure Pipelines. Aside from the test commands that have been shown throughout this tutorial, we need to add a couple of extra tasks. Azure Pipelines comes with an artifact publishing, hosting and indexing API that you can use through the tasks. You can also see the artifacts from a build in the web interface.
In the example project, I’ve created a really simple Python package, with a setup.py and setuptools configured.
To install the dependencies, this time we’ll install the package using pip install -e . once we’ve changed to the source directory.
- script: |
   python -m pip install --upgrade pip
   pip install -r library-basic/requirements.txt
   cd library-basic
   pip install -e .
  displayName: 'Install dependencies'
Now, to test the library we can use Pytest again to generate the Junit XML output:
- script: |
   cd library-basic
   pytest --junitxml=../reports/library-basic.xml
  displayName: 'Run tests'
Then, after the test results have been published, the sdist (source distribution, a tar.gz copy of the source files, and a binary wheel can be built and published in the artifact repository using the CopyFiles and PublishBuildArtifacts tasks:
- script: |
    cd library-basic
    python setup.py sdist bdist_wheel
  displayName: 'Run tests'
- task: CopyFiles@2
   inputs:
     contents: library-basic/dist/**
     targetFolder: $(Build.ArtifactStagingDirectory)
- task: PublishBuildArtifacts@1
   inputs:
     pathtoPublish: $(Build.ArtifactStagingDirectory)
     artifactName: Library_Basic_Wheel
Azure Pipelines has support for publishing the packages to PyPi, but I haven’t added that to my examples. It’s well documented on the website.
trigger:
- master
name: $(Date:yyyyMMdd)$(Rev:.r)
jobs:
 - job: 'library_basic'
  pool:
    vmImage: 'Ubuntu-16.04'
  strategy:
    matrix:
      Python36:
        python.version: '3.6'
      Python37:
        python.version: '3.7'
    maxParallel: 2
  steps:
  - task: UsePythonVersion@0
    inputs:
      versionSpec: '$(python.version)'
  - script: |
      python -m pip install --upgrade pip
      pip install -r library-basic/requirements.txt
      cd library-basic
      pip install -e .
    displayName: 'Install dependencies'
  - script: |
      cd library-basic
      pytest --junitxml=../reports/library-basic.xml
    displayName: 'Run tests'
  - task: PublishTestResults@2
    inputs:
      testResultsFiles: 'reports/library-basic.xml'
      testRunTitle: '$(Agent.OS) - $(Build.BuildNumber)[$(Agent.JobName)] - Python $(python.version)'
    condition: succeededOrFailed()
  - script: |
      cd library-basic
      python setup.py sdist bdist_wheel
    displayName: 'Run tests'
  - task: CopyFiles@2
    inputs:
      contents: library-basic/dist/**
      targetFolder: $(Build.ArtifactStagingDirectory)
  - task: PublishBuildArtifacts@1
    inputs:
      pathtoPublish: $(Build.ArtifactStagingDirectory)
      artifactName: Library_Basic_Wheel
Testing a modern Python library with pyproject.toml
If you’re using pyproject.toml as your configuration file and using Flit to publish and build packages, there are a few changes to make to the previous example.
- Run
flit installinstead ofpip install -e. - Run
flit buildinstead ofpython setup.py sdist bdist_wheel - Replace the version number with the build number
- job: 'library_flit'
  pool:
    vmImage: 'Ubuntu-16.04'
  strategy:
    matrix:
      Python36:
        python.version: '3.6'
      Python37:
        python.version: '3.7'
    maxParallel: 2
  steps:
  - task: UsePythonVersion@0
    inputs:
      versionSpec: '$(python.version)'
  - script: |
      python -m pip install --upgrade pip
      pip install pytest flit mock codecov pydocstyle pytest-cov
      cd library-flit
      flit install
    displayName: 'Install dependencies'
  - script: |
      cd library-flit
      python -m pytest tests/ --junitxml=../reports/library-flit.xml --cov=demolib
      codecov
    displayName: 'pytest'
    env:
      CODECOV_TOKEN: '<CODECOV.IO TOKEN'
  - script: pydocstyle --ignore=D301,D212,D203 library-flit/demolib
    displayName: 'pydocstyle'
  - script: |
      cd library-flit
      sed 's/.dev/.dev$(Build.BuildNumber)/g' demolib/__init__.py
      flit build
    displayName: 'Build wheel'
  - task: PublishTestResults@2
    inputs:
      testResultsFiles: 'reports/library-flit.xml'
      testRunTitle: '$(Agent.OS) - $(Build.BuildNumber)[$(Agent.JobName)] - Python $(python.version)'
    condition: succeededOrFailed()
  - task: CopyFiles@2
    inputs:
      contents: library-flit/dist/**
      targetFolder: $(Build.ArtifactStagingDirectory)
  - task: PublishBuildArtifacts@1
    inputs:
      pathtoPublish: $(Build.ArtifactStagingDirectory)
      artifactName: Library_Flit_Wheel
Finally, if you want to download the artifacts and install them as a final verification, you can add an additional job like this:
- job: 'install_library'
  dependsOn: 'library_flit'
  pool:
    vmImage: 'Ubuntu-16.04'
  strategy:
    matrix:
      Python36:
        python.version: '3.6'
      Python37:
        python.version: '3.7'
    maxParallel: 2
  steps:
  - task: UsePythonVersion@0
    inputs:
      versionSpec: '$(python.version)'
  - task: DownloadBuildArtifacts@0
    inputs:
      buildType: 'current'
      downloadType: 'single'
      artifactName: 'Library_Flit_Wheel'
      itemPattern: '**'
      downloadPath: '$(System.ArtifactsDirectory)'
  - script: |
      python -m pip install --upgrade pip
      find $(System.ArtifactsDirectory)/Library_Flit_Wheel/library-flit/dist/*.whl | xargs pip install
    displayName: 'Install package'
Some other pointers I learned whilst writing these examples:
- Each script step will start from the root path, even if the previous step changed directories.
- Try to avoid using too much bash-scripting in your steps that is specific to Linux, this makes it easier to copy steps for Windows. In PowerShell, many of the commands you would expect in Linux exist, like
cdlsmkdirrm.
Related Posts