In this tutorial, I’ll talk about the PyPy interpreter and how you can deploy a FastAPI Python application into production swapping out PyPy for CPython as the Python interpreter.
All of the code for this tutorial is on GitHub.
What is PyPy
PyPy is an alternative Python interpreter. The Python interpreter you get bundled with Linux distributions, macOS, from the Windows Store or from python.org/downloads is CPython. CPython is the most-popular Python interpreter (by a long way). But it is not the fastest. CPython is a general-purpose interpreter.
Why use PyPy over CPython?
PyPy is a performant alternative to CPython. PyPy can run most code that runs in CPython. You can run popular frameworks like requests, Django, Flask, FastAPI. You can run tests in frameworks like Pytest.
PyPy is available for Python versions 2.7, 3.7, 3.8 and 3.9. It supports Linux, macOS and Windows.
You’d consider choosing PyPy over CPython because for many workloads it is faster. Much faster.
The speed difference depends greatly on the type of task being performed. The average of all benchmarks is 4.5 times faster than CPython.
Some things that PyPy is great at:
- Instantiating classes
- Numerical calculations
- Function and method calls in deep stacks
On the flip side, it’s not so great at:
- Short, small scripts (because it has a high startup time)
- Work with lots of dictionaries
- Integration with C extensions
Benchmark your application and see if it makes sense. In many production environments, CPython is not the bottleneck. The bottlenecks are external services like databases, network latency, storage and logging.
Example: Deploying a FastAPI application on PyPy
First, you’ll need a copy of PyPy. My strong recommendation is to use a Docker image, such as the official pypy:3.9-slim-buster image.
If you want to install locally outside of Docker, you can use one of the downloadable binaries.
Once PyPy is installed, or if you’re inside a Docker image, you follow the same workflow as with CPython.
First, create a virtual environment, using the same venv module that CPython uses:
pypy3.9 -m venv .venv
source .venv/bin/activate
Next, setup your editor to use this virtual environment. I’m using VS Code, so I select the interpreter by using the Python: Select Interpreter command in the command pallette:

Next, setup a Docker image so the app is testable locally and runnable in the cloud.
Setting up a Docker image
To keep the installation of PyPy simple both in the production environment and in development, we’ll use Docker from now on.
The Docker image I’m using is the 3.9-slim-buster image from the pypy org on Docker hub. There are slim-bullseye, bullseye and buster images too in the tags.
My Dockerfile is a copy+paste of my usual Python dockerfiles. The only thing I’m changing is to run pypy instead of python to execute both the pip installation and to run the web application.
My demo application is normally run with python -m uvicorn api.main:app, so the equivalent Dockerfile is:
FROM pypy:3.9-slim-buster
COPY . /api
WORKDIR /api
ENV TZ=Europe/London
RUN ln -snf /usr/share/zoneinfo/$TZ /etc/localtime && echo $TZ > /etc/timezone
RUN apt-get -y update && apt-get clean -y && rm -rf /var/lib/apt/lists/*
COPY ./api/requirements.txt /code/requirements.txt
RUN pypy -m pip install -U pip && pypy -m pip install --no-cache-dir --upgrade -r /code/requirements.txt
COPY ./api /code/app
CMD ["pypy", "-m", "uvicorn", "--host", "0.0.0.0", "--port", "80", "--proxy-headers", "api.main:app"]
If you want to develop inside this Docker image, you can create a dev container. I’ve written a todo on how to configure this over at RealPython.com.
Deploying to Azure
Azure’s PaaS options for Python like Azure Functions and Azure Web Apps are built on CPython. PyPy is not an option out-of-the-box. However you can deploy custom Docker images both to Azure Web Apps and to the shiny-new Azure Container Instances (ACI) platform.
I’m going to use ACI because it’s the simplest way to throw a container at the cloud and watch it fly. I’ll assume you have the Azure CLI installed and that you have an Azure Subscription.
There are 3 components required to run this app:
- A resource group (not billable in Azure)
- A Container Instance
Also, you’ll need somewhere to put the Docker images. I’ll show you how to deploy with an Azure Container Registry. You can instead use Docker hub or any other hosting platform.
First, setup some variables in Bash
RG=my-web-app          # Resource group name
ACR=myregistry1        # Azure Container Registry name
IMAGE=my-web-app       # Docker image name
NAME=my-web-app        # Application name, also used as the DNS record
LOCATION=australiaeast # DC location
Now create the Azure resource group and Azure Container Registry:
az group create --location $LOCATION --name $RG
az acr create --name $ACR --resource-group $RG --sku Basic --admin-enabled true
az acr credential show --name $ACR
Sign in to the container registry with those credentials. Build and upload the Docker image:
docker login ${ACR}.azurecr.io
docker build -t ${IMAGE}:1.0.0 .
docker tag ${IMAGE}:1.0.0 ${ACR}.azurecr.io/${IMAGE}:1.0.0
docker push ${ACR}.azurecr.io/${IMAGE} -a
Create an Azure Container Instance and deploy from the Docker image:
az container create --resource-group $RG --name $NAME --image ${ACR}.azurecr.io/${IMAGE}:1.0.0 --dns-name-label $NAME --ports 80
az container attach --resource-group $RG --name $NAME
open http://${NAME}.${LOCATION}.azurecontainer.io/
Optionally you can add a CNAME record to an Azure DNS managed zone.
az network dns record-set cname set-record -g $RG -z api.mysite.com -n MyRecordSet -c ${NAME}.${LOCATION}.azurecontainer.io
If you want to automate those steps by setting up a CI/CD workflow, checkout the official docs with a Github actions example.
So, is it faster?
To test this, we can run a simple benchmark. Using [Apache Bench] we can make 10 requests to the /locations endpoint. I’ve seeded the database with 10,000 records and used the in-process SQLite API with aiosqlite, an async API. The data-reflection is being done using Tortoise ORM, an ORM written in Python.
This is an exaggerated API call as it’s handling a lot of data. I’ve done this so it’ll be clearer whether it made a difference. So first, lets try PyPy 3.9
$ ab -n 10 -c 10 http://localhost:8080/locations
Concurrency Level:      10
Time taken for tests:   1.809 seconds
Complete requests:      10
Failed requests:        0
Total transferred:      5696340 bytes
HTML transferred:       5694860 bytes
Requests per second:    5.53 [#/sec] (mean)
Time per request:       1808.936 [ms] (mean)
Time per request:       180.894 [ms] (mean, across all concurrent requests)
Transfer rate:          3075.20 [Kbytes/sec] received

Connection Times (ms)
              min  mean[+/-sd] median   max
Connect:        0    0   0.1      0       0
Processing:   198  836 512.0    905    1625
Waiting:      183  822 512.0    890    1615
Total:        198  836 512.0    905    1625

Percentage of the requests served within a certain time (ms)
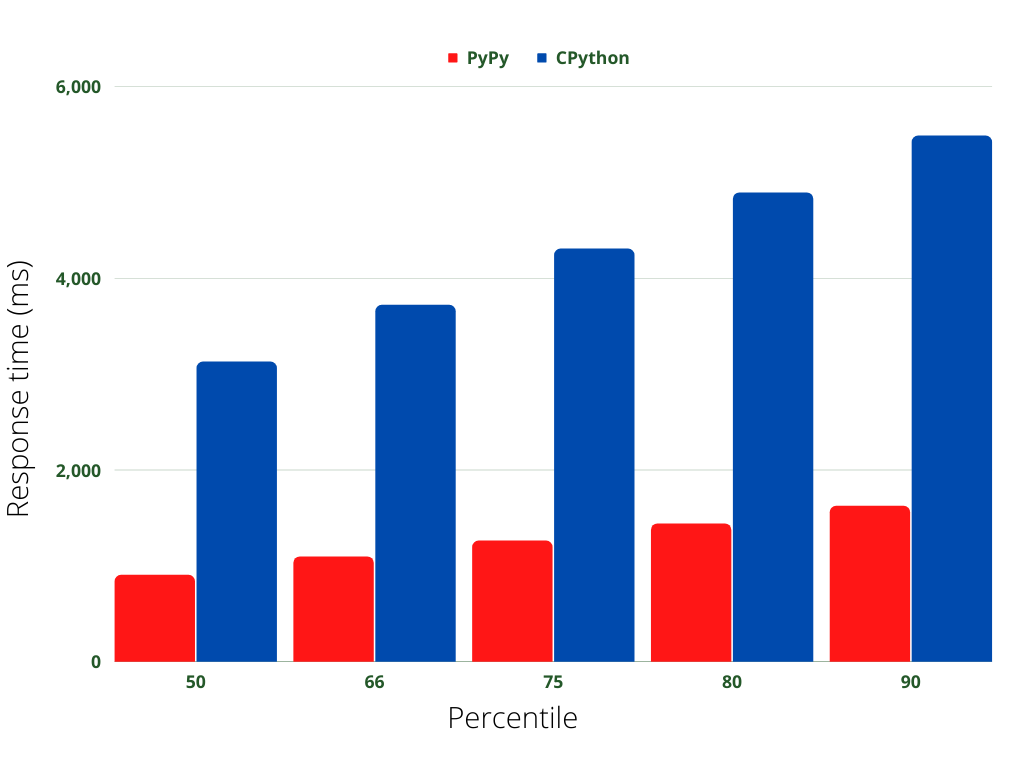
  50%    905
  66%   1097
  75%   1263
  80%   1441
  90%   1625
  95%   1625
  98%   1625
  99%   1625
 100%   1625 (longest request)
Next, change the Dockerfile to use the python:3.9-slim-buster image and use python instead of pypy to run all the commands. Deploy the image again and I ran the same benchmark against the CPython version:
Concurrency Level:      10
Time taken for tests:   6.108 seconds
Complete requests:      10
Failed requests:        0
Total transferred:      5696340 bytes
HTML transferred:       5694860 bytes
Requests per second:    1.64 [#/sec] (mean)
Time per request:       6107.645 [ms] (mean)
Time per request:       610.764 [ms] (mean, across all concurrent requests)
Transfer rate:          910.80 [Kbytes/sec] received

Connection Times (ms)
              min  mean[+/-sd] median   max
Connect:        0    0   0.1      0       0
Processing:   636 2851 1741.2   3127    5486
Waiting:      621 2839 1741.7   3115    5474
Total:        636 2852 1741.1   3127    5486

Percentage of the requests served within a certain time (ms)
  50%   3127
  66%   3720
  75%   4307
  80%   4893
  90%   5486
  95%   5486
  98%   5486
  99%   5486
 100%   5486 (longest request)
So, the results are that the response times are 3-4x faster from the 50th to the 90th percentiles!

But, is it really that simple? After posting this on Twitter, I got a number of requests for more data. The example above benefits from PyPy’s optimizations because it is a slow API call which needs to query, process and serialize 10,000 records. What about memory?
I spawned the container again and ran a small bash script in another terminal to poll the memory usage of the container:
while true; do docker stats --no-stream --format '{{.MemUsage}}' thirsty_swanson | cut -d '/' -f 1 >>docker-stats; sleep 1; done` in
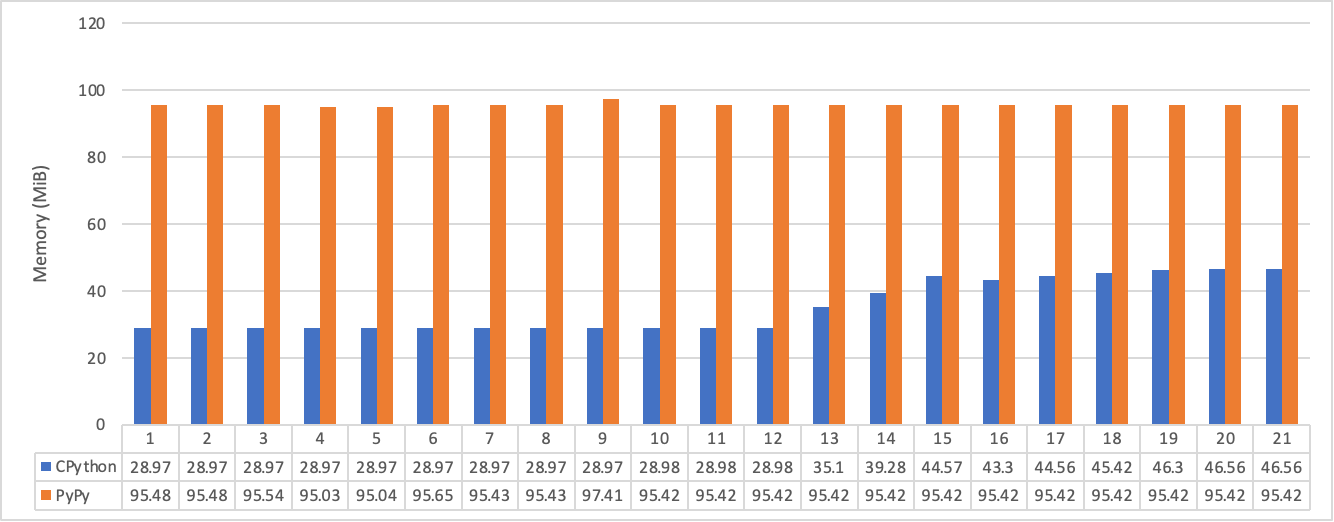
When graphed it showed that the baseline memory usage of the web app is higher in PyPy.

However, we’re talking about 45 vs 95 MiB of RAM, which is miniscule. The memory usage of PyPy doesn’t ramp up with the requests so it appears to be pre-allocated against the process. It would make sense to run a continued benchmark against different API calls using a suite like locust, as I’ve shown in another blog post.
The first benchmark was against a response for a very-slow API function. What about a faster one?
A call to GET /locations/1 on the example app will do a single record lookup and return a single record from the Locations table.
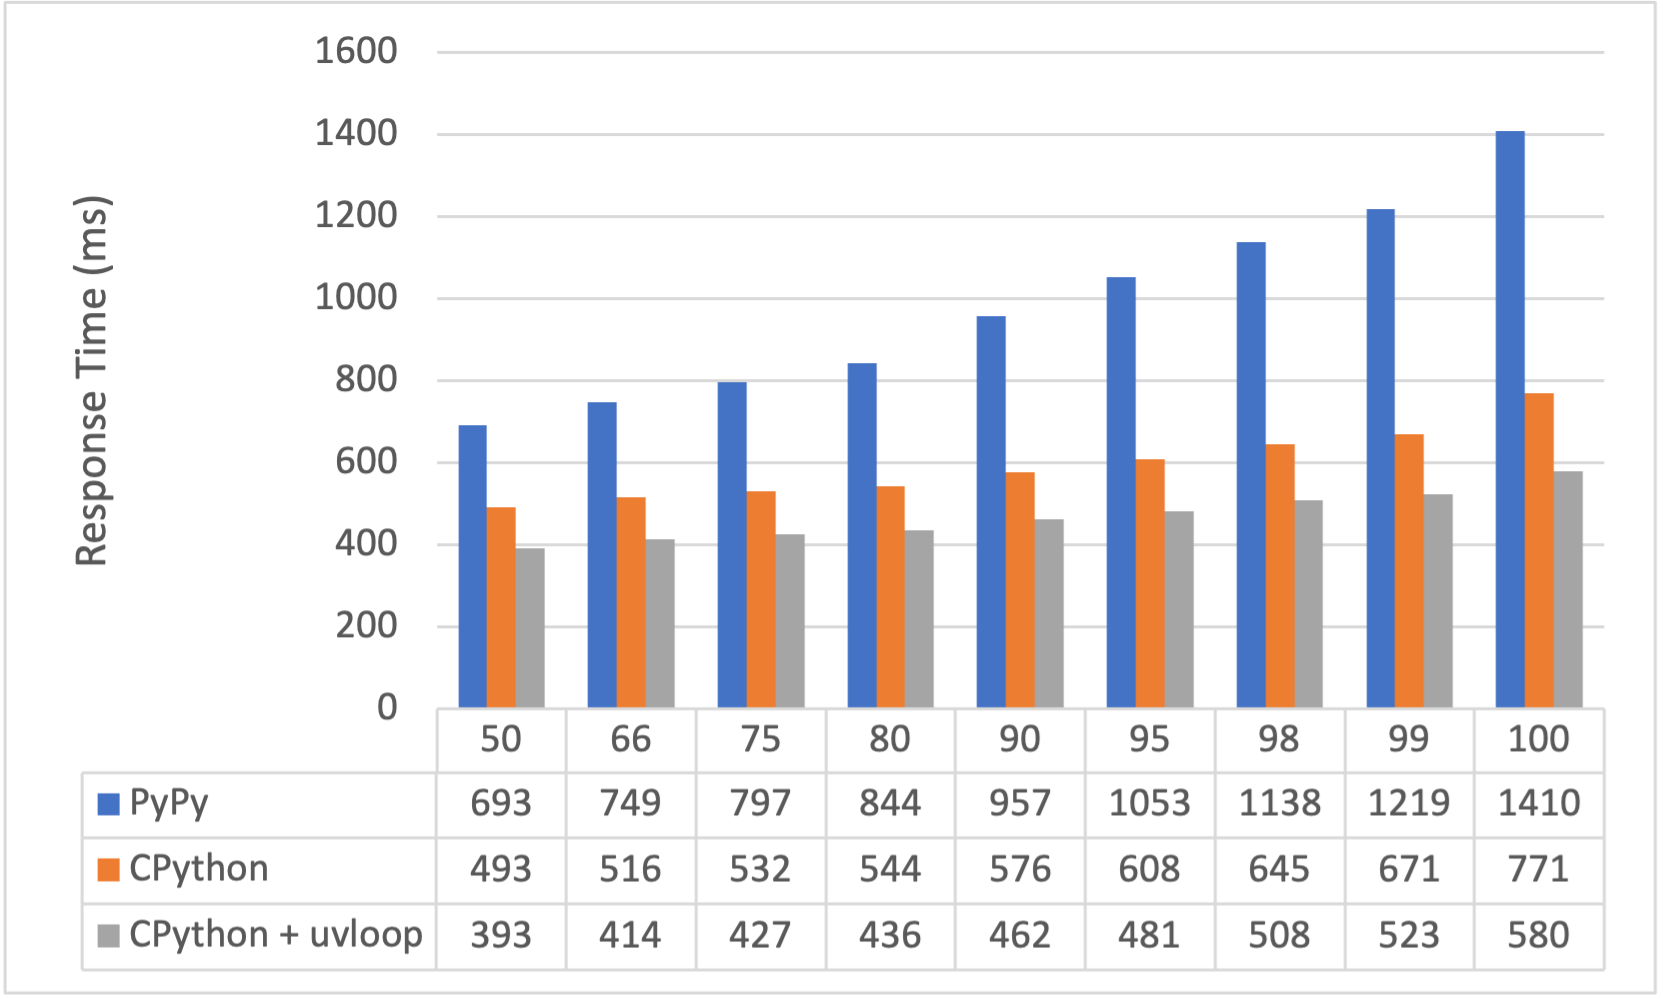
Since Uvicorn should be able to handle a bit more of a hammer, I’ve kicked up the concurrency to 100 and the requests to 10,000. The results are totally different to the first benchmark.
I’ve also added (thanks to a Twitter comment) uvloop to the Uvicorn configuration to improve the CPython benchmark. I wasn’t able to install uvloop with PyPy, so I’m showing it with and without for fairness.

- Uvloop adds a 10-20% performance gain to response times
- Response times are 20% slower at the 50th Percentile for PyPy and 100% slower for the 100th Percentile
My assumption for the poor performance is that PyPy doesn’t have much opportunity to optimize the core HTTP process, the FastAPI pipeline and the API route. Compared with the “slow” call, which does a lot more pure Python, with lots of loops, dictionaries and class instantiation.
In conclusion. Swapping CPython for PyPy could be a simple way to get instant performance gains on your Python application. Or it might not. Either way, it’s simple to try it out and benchmark.
I recommend writing a full benchmark suite on Locust to decide for yourself.


