In this blog post, I’m going to review some best practices for configuring Python web servers like Gunicorn, Uvicorn, and Hypercorn. We’ll recap the architecture of all the bits of software that sit between your Python code and your users. We’ll also touch on verification methods like load testing to check that your configuration stands up against some user traffic.
A recap of Python Web Application architecture
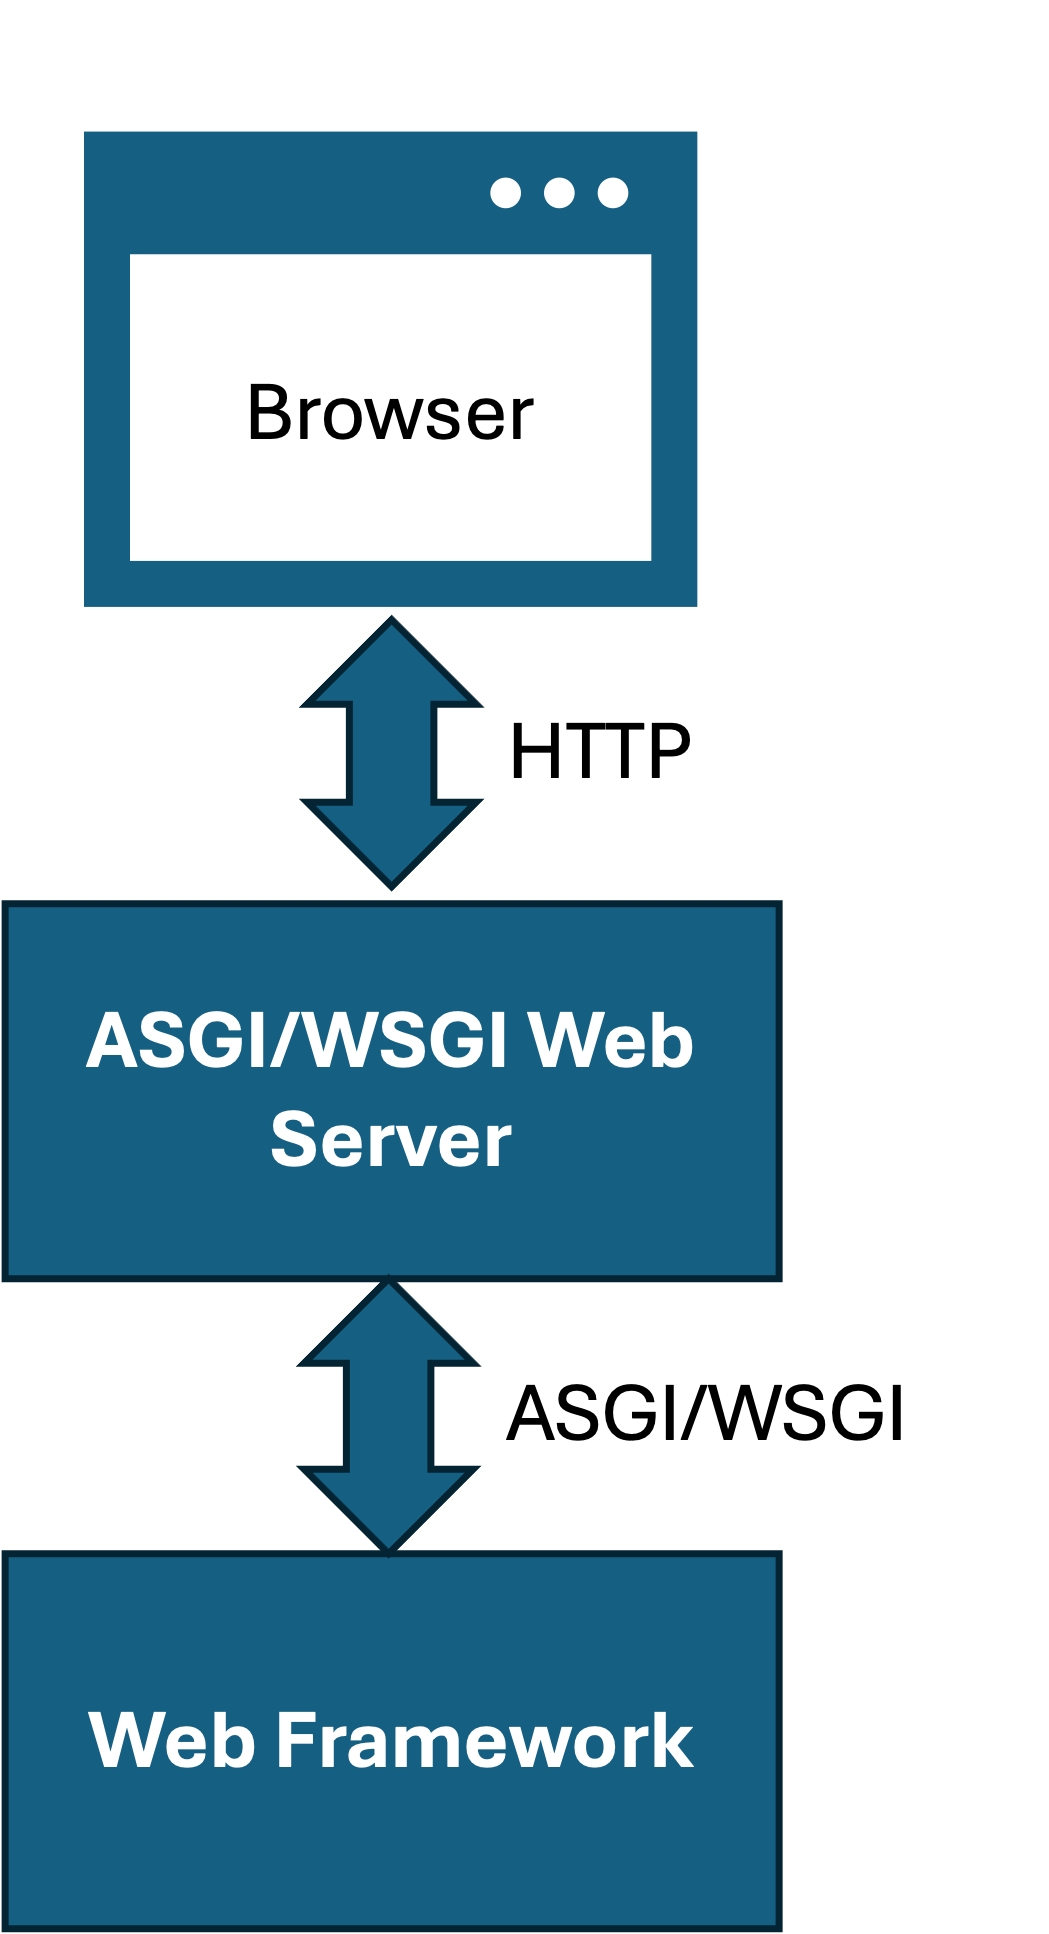
When developing with a Python web framework like Django, Flask, or FastAPI you need to stack additional bits of software on top before users can browse your site in a web browser. Those bits of software are:
- A ASGI/WSGI web server that launches your web application and listens on HTTP for user requests
- (Optionally) a performant HTTP server for delivering static assets like pictures, CSS style sheets, and JavaScript source files.
Firstly covering the simpler of the two options, the ASGI/WSGI web server that goes between your Python code in the web framework and the users who have a web browser:
ASGI/WSGI servers are specifically designed for handling HTTP traffic destined for Python code. Most HTML pages have lots of static assets like pictures, CSS files and JavaScript. It is inefficient to send all those requests through ASGI/WSGI web servers and have Python handle them. A better solution is to put another HTTP server in front of the ASGI/WSGI server that specifically handles static content:
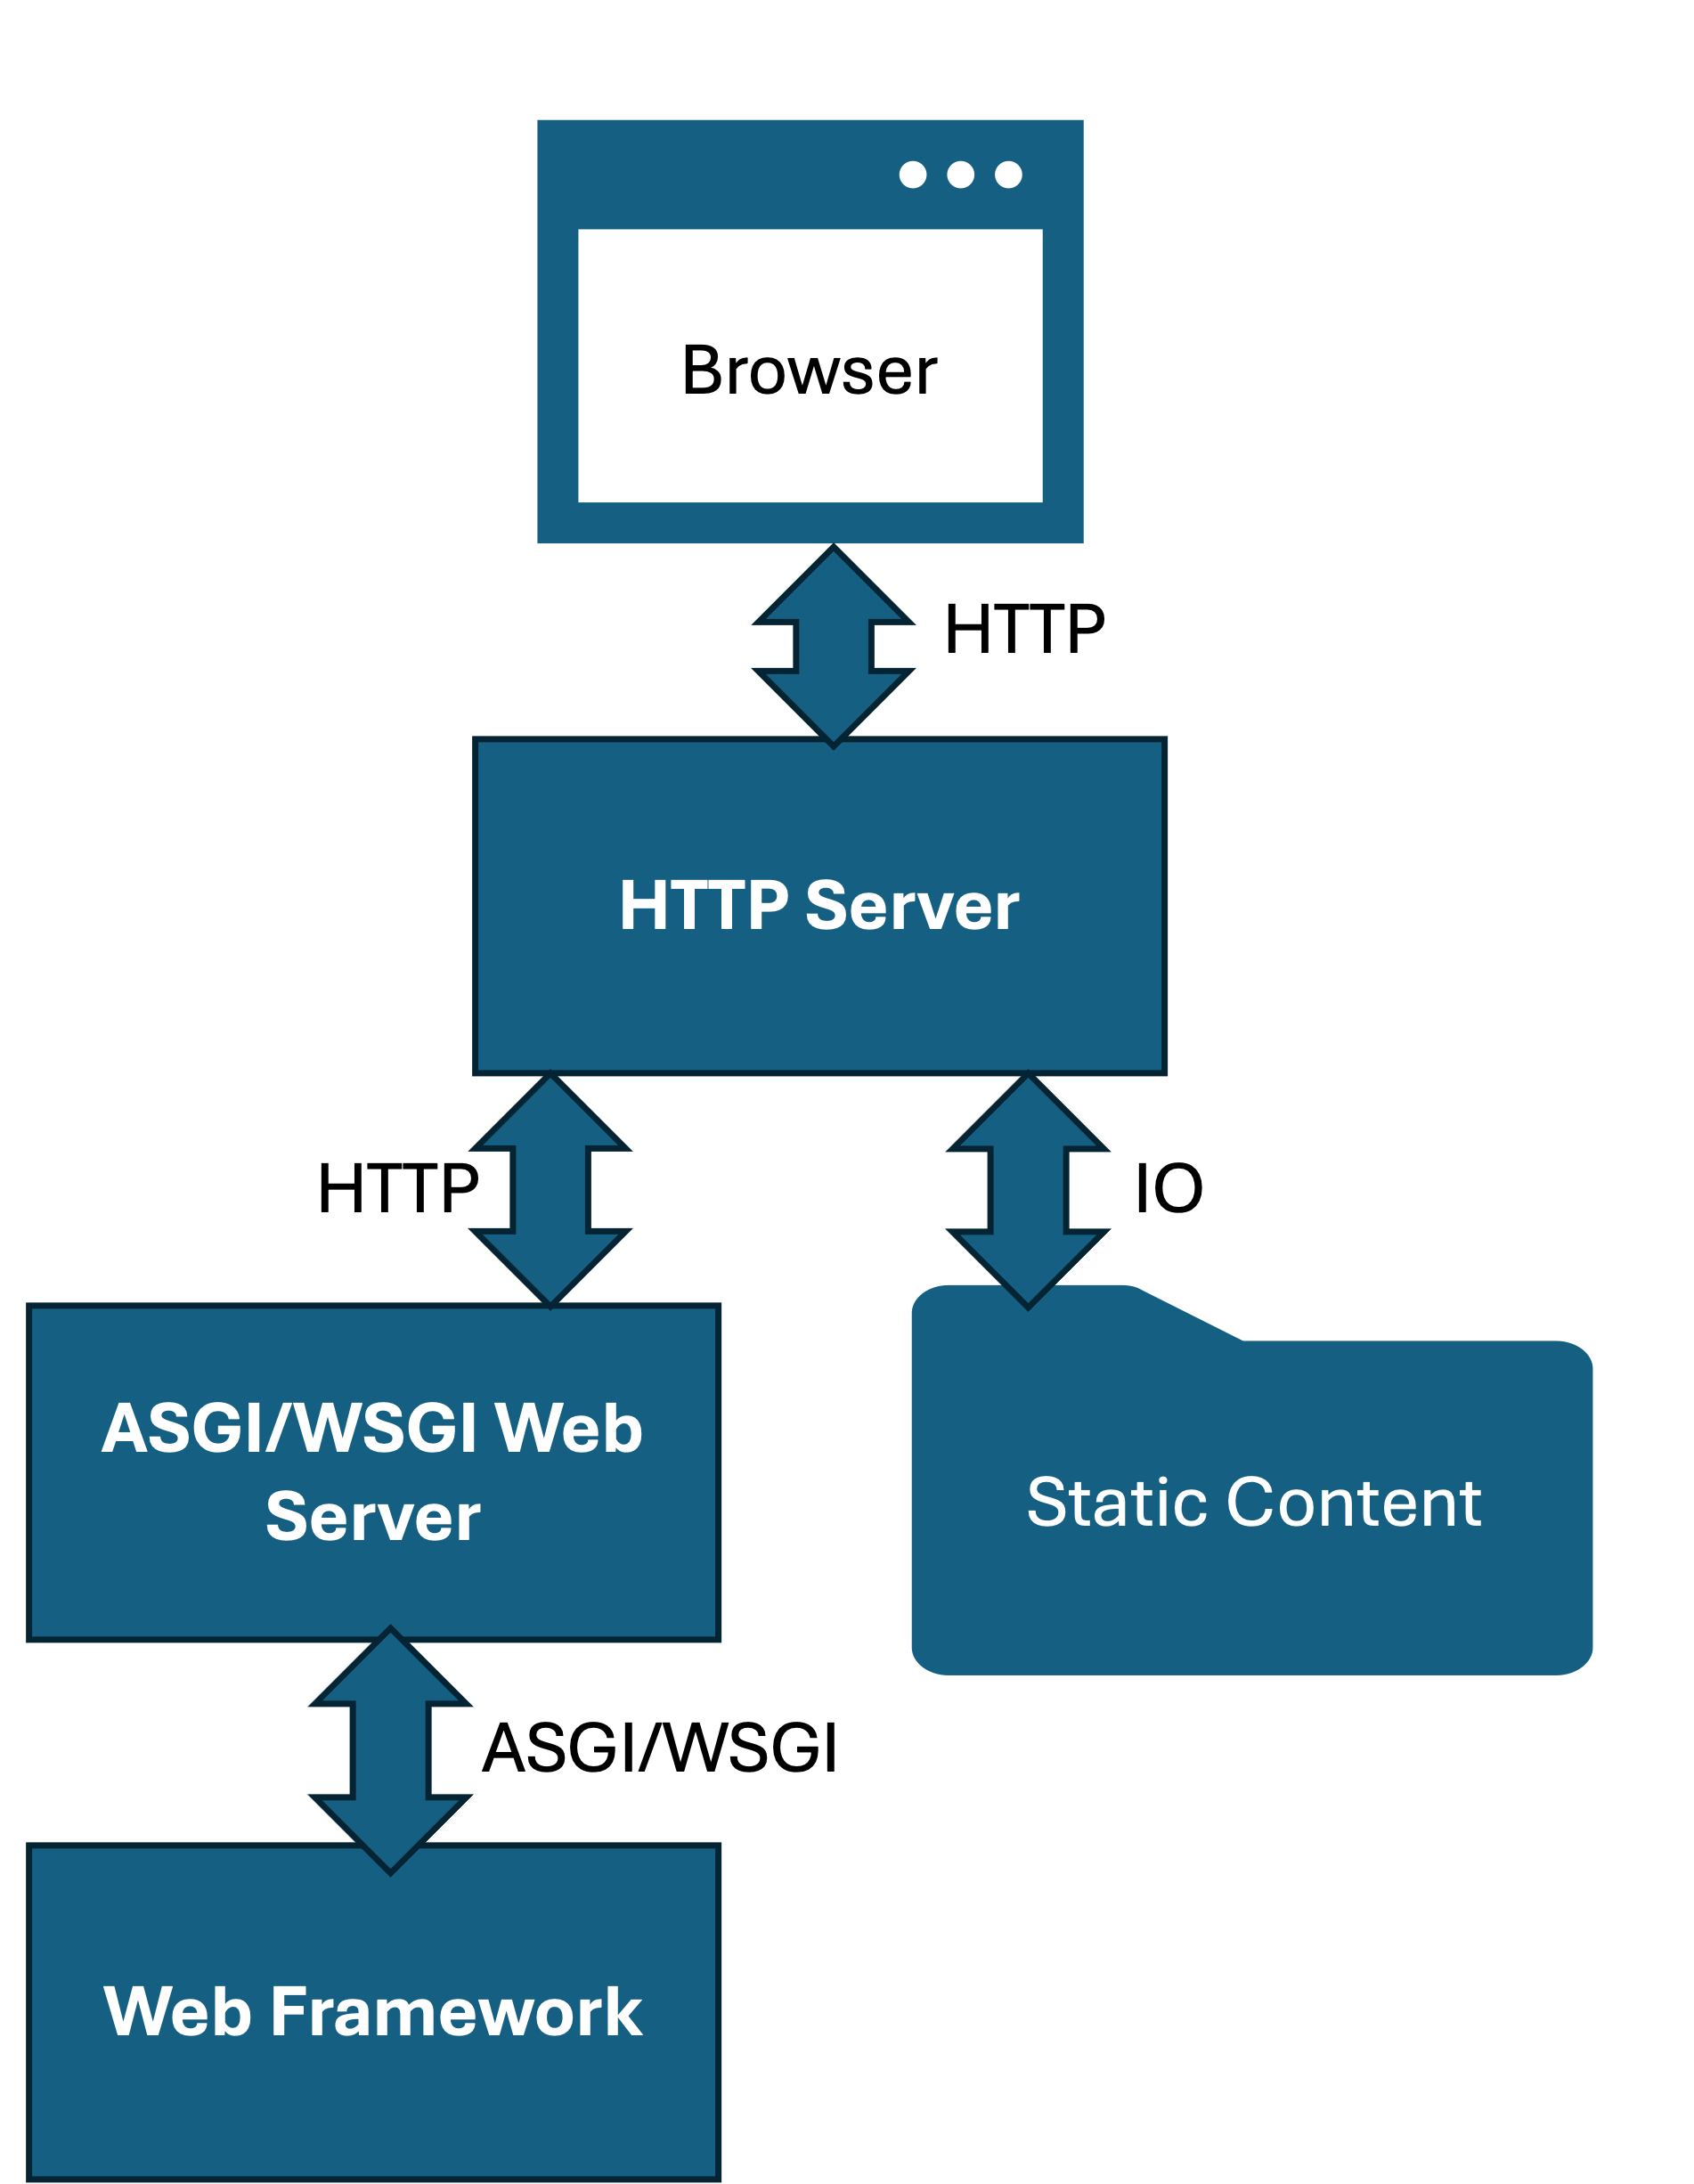
I’m not going to go into detail on this architecture within this post, but the folks at RealPython.com have a nice tutorial on this.
There are two methods of communication in this diagram between the user and your application. The first is the request from the browser to the web server over the standard HTTP protocol. The first server must listen on HTTP, the web framework you’ve been using to develop your app (Django, Flask, FastAPI) doesn’t listen on HTTP though, it listens on a different interface called ASGI (Asynchronous Gateway Interface) or WSGI (Web Server Gateway Interface).
But wait, “when I’ve been developing I’ve been running python manage.py runserver or flask run and I could browse in a web browser, why do I need more software” I hear you cry…

All of the web frameworks come with a micro HTTP server designed for development and testing. These micro HTTP servers are designed for 1 user. They also have a bunch of debugging features turned on for ease of use. Whilst you technically could ship your lemonade stand of a web server to production, as soon as you start getting a few users the queues will be long.
What you need for your web application to handle volumes of traffic is a web server that’s designed to handle many requests at the same time and queue requests when it’s busy. This is where the ASGI/WSGI server comes in. If the micro HTTP server was a lemonade stand, then the ASGI/WSGI web server is a commercial kitchen with a counter of employees taking orders and delivering food.

So far I’ve used ASGI and WSGI interchangeably but they are distinctly different protocols. The difference is important to understand.
WSGI or ASGI which one is it?
WSGI was the standard interface between web servers and Python web frameworks. WSGI is an abstraction layer that enables development of Python web servers without being bound to the APIs of the Web Frameworks like Flask and Django.
The limitation with WSGI is that it was designed before async in Python. Web Applications can greatly benefit from asynchronous code and coroutines in Python because much of a request pipeline (the things that happen delivering a web request) is spent waiting for things, like the result of a SQL query or another API to be run. These are ideal candidates for async.
ASGI was introduced as a successor for WSGI specifically designed for Async web frameworks. The web framework has to support ASGI in order for you to use it. FastAPI only supports ASGI so that is straightforward. Flask only supports WSGI but you can use Quart if you want to write Async Flask Applications. Django is a bit more complicated. Django 3 introduced an ASGI interface but it is very limited and full async support came to Django in version 4 and above.
| Framework | Support |
|---|---|
| Flask | WSGI |
| Quart | ASGI |
| Django <=3 | WSGI |
| Django >= 4 | WSGI/ASGI |
| FastAPI | ASGI |
Django and async
Upgrading to the latest version of Django and switching to ASGI is only part of the story for getting async support in Django. Your application needs to fully support async to get any of the benefits of async. This includes:
- Writing async views
- Using async queries in the ORM
- Using an async HTTP client library like aiohttp or httpx for any backend API calls
- Upgrading your middleware to async-compatible
If you just run ASGI in front of sync (traditional) views or your code is still calling the sync version of the ORM query methods then your application will likely run slower than WSGI for reasons we’ll go into later.
Flask and async
Like Django, Flask was written for WSGI and predates async support in Python. Designing an async API for Flask would be quite a challenge unless you just stuck _async on the end of every function call, so instead an alterative Flask-compatible project called Quart was created. Quart is now maintained by the same folks as Flask over at the Pallets Project. If you want to switch to Quart and ASGI you can follow these steps:
- Upgrade your views to async and other steps in their migration guide
- Changing any SQL Alchemy code to use the async interfaces
- If you’re using MongoDB, switch to an async ODM or Mongo Driver
- Look at your middleware and see if async options are available
FastAPI and async
FastAPI was designed as a fully-async web framework. It supports ASGI as standard and everything is async. You’re good to go.
WSGI or ASGI - which one is faster?
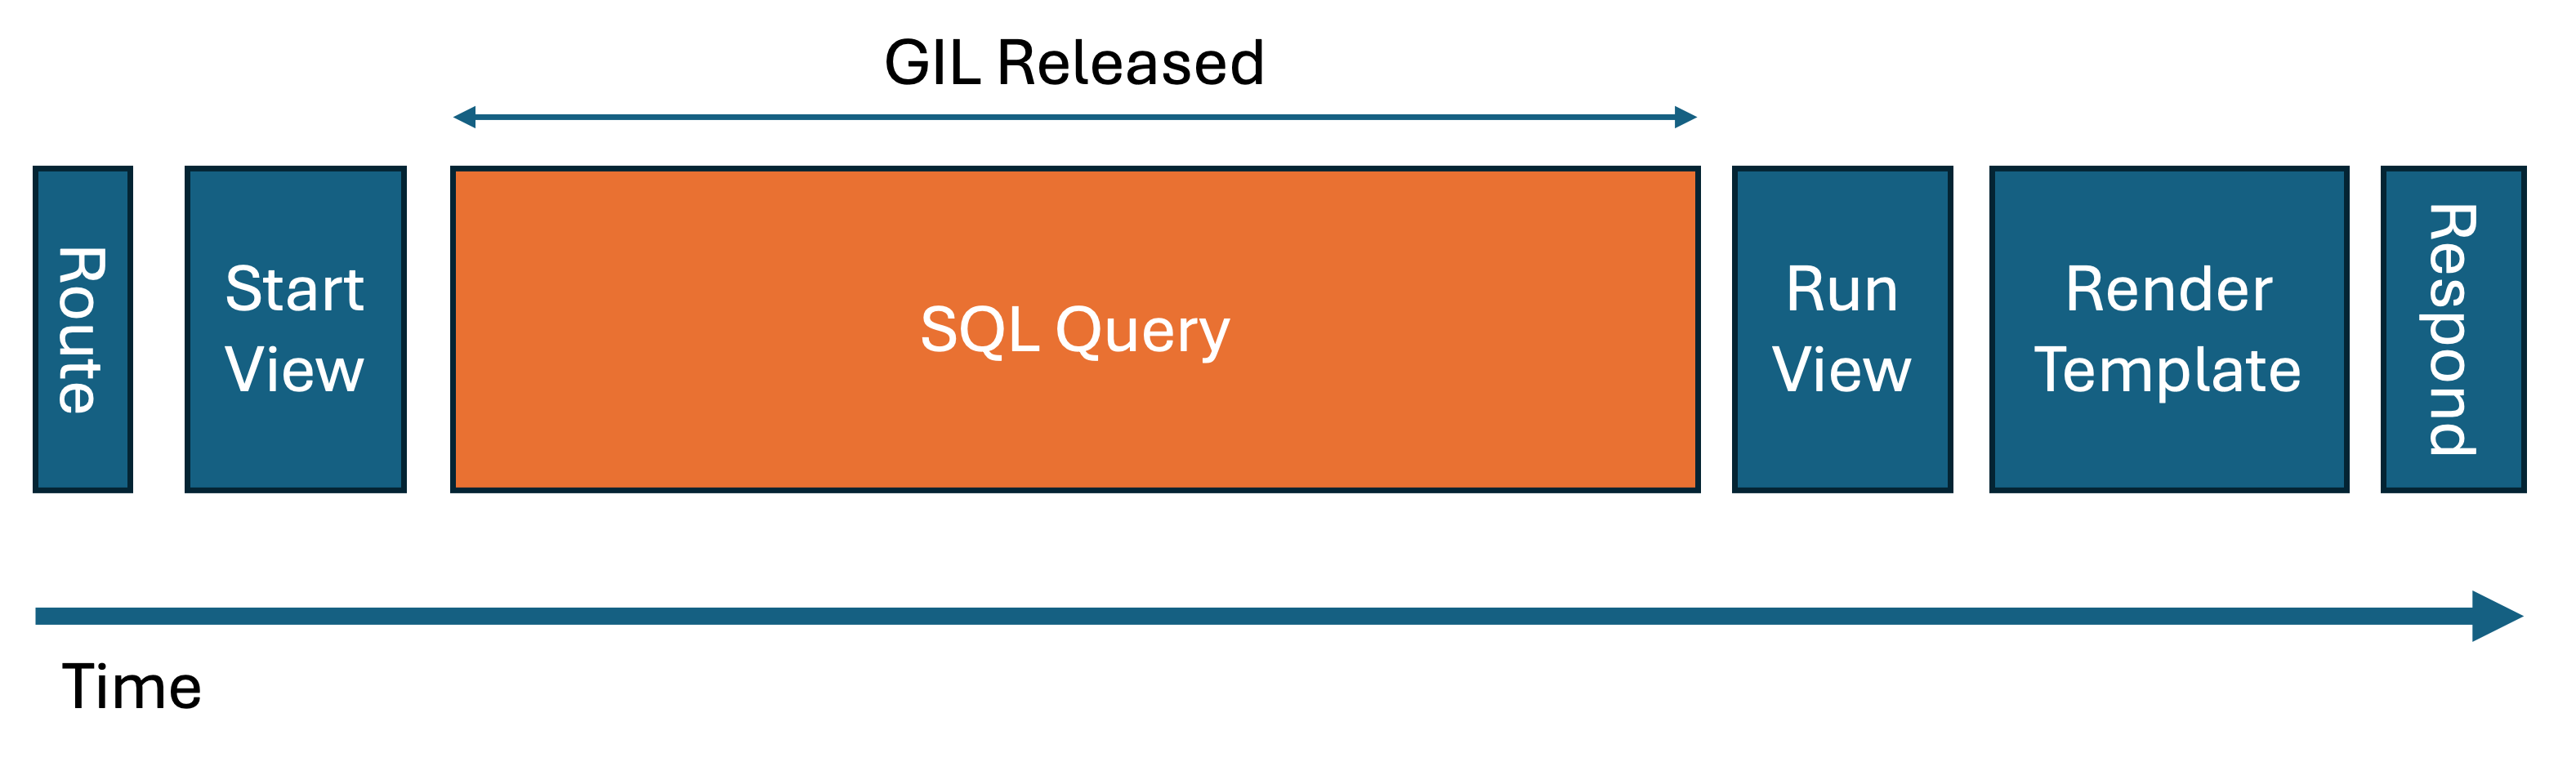
The answer to that question is interlinked with the rest of this blog post. It really comes down to how Python handles concurrent and parallel code. You may have heard of the GIL (Global Interpreter Lock) in Python which means that even with multi-threading, Python will only execute on 1 CPU core at any time. Well, this is important for web applications that want to service multiple users at once (you have more than 1 user right?). There is a very important consideration when optimizing Python web applications–
Most of a web page execution time is spent doing IO
Those IO tasks include:
- Querying a database
- Reading things from disk, like data files, templates
- Calling other APIs
- Reading caches from memory or external systems like Redis
The GIL largely doesn’t apply to IO tasks, the lock is released by Python for almost all IO activities. So therefore if you have a pool of threads, you can handle and process multiple web requests simultaneously. Take this example where the SQL Query takes up the majority of the time to respond, the GIL is released so that process can handle other requests whilst your database server responds:
Coming back to the original question - is WSGI or ASGI faster? Well, if you assume that WSGI is deployed using a thread pool for requests compared with ASGI which uses coroutines to handle requests, then ASGI is faster because coroutines are much, much faster to start. But, when I say much, much faster that’s in the scale of milliseconds vs nanoseconds and if your web page takes 200ms to respond, shaving off 0.05ms from that response time by using coroutines is going to be negligible.
More important than the start time is that coroutines scale horizontally much better than threads because they have a smaller overhead. Uvicorn will happily run 100 requests concurrently on a single worker. Compare that to the thread recommendation we go into later is around 2 threads per worker.
Gunicorn, Uvicorn or Hypercorn?
So now that you know if you want ASGI or WSGI, you need to pick a web server. Gunicorn, Uvicorn, and Hypercorn are the three most popular options so we’ll explore those.
- Gunicorn is the most popular WSGI server
- Uvicorn is an ASGI server. It is both a standalone server as well as a plugin for Gunicorn
- Hypercorn is an alternative that supports both WSGI and ASGI
Workers and Threads
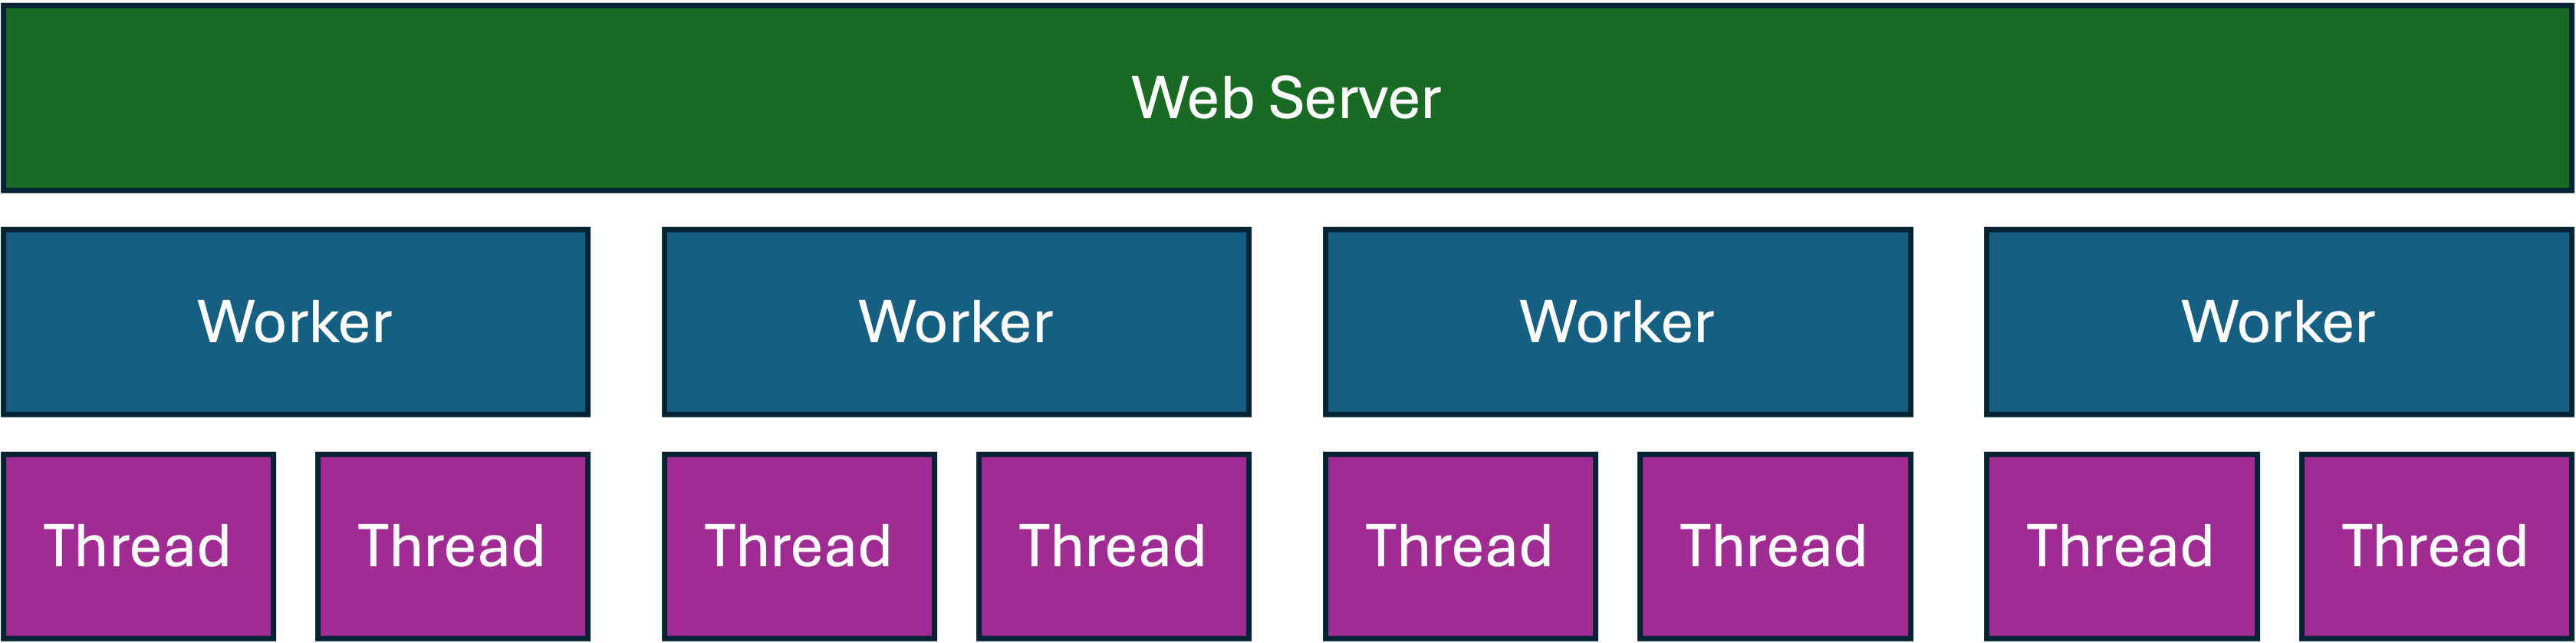
When configuring any of the web servers, you need to set the number of workers. Workers are Python processes that can run parallel work on separate CPU cores. Workers are spawned (started) by the web server when it starts and stopped when it shuts down.
By default Gunicorn will start with 1 worker. If you have multiple CPU cores on your server, this means it will only be using 1 at any time and the others will be idle. We don’t want that. If we have 4 CPU cores we want all 4 to be serving requests and running our Python app at the same time. For that reason the general best practice is to set the number of workers to be at least the number of CPU cores on the server.

Workers is the first setting to choose and then the number of threads (for WSGI) is the second. Let’s pin down the workers setting first.
Setting the number of workers
There are two important things to remember when setting workers:
- You are limited by the number of CPU cores
- Most of the time processing requests is spent doing concurrent tasks
A best practice I’ve seen floating around is to set the number of workers equal to the number of CPU cores. This recommendation ignores an important technology called Hyper-threading, which enables 2 threads to run on the same CPU core at the same time on certain Intel CPUs. If you spawned two threads inside a single Python worker, because of the GIL they wouldn’t use Hyper-threading. Also, I said that most IO activities in Python release the GIL. There are still some libraries that don’t, so you may have some edge cases where a worker might not be fully utilizing the CPU core because of a lock on the GIL.
What’s to stop you from setting the number of workers to a really big number then? 100? 1000?
Well, Gunicorn and Hypercorn both use the multiprocessing module for spawning workers (see my last blog post). Workers are Python processes and Python processes consume a lot of memory, even when they’re idle. So if you started a large number of workers the web server would use a lot of memory before it even starts your Python application. Secondly, you’re not gaining any additional throughput if your CPU Cores are all busy by throwing more workers at the problem.
My general advice is the number of workers is set to the number of CPU cores * 2 + 1.
In Python, this can be worked out at runtime using this code:
import multiprocessing
workers = (multiprocessing.cpu_count() * 2) + 1
ASGI Applications
ASGI uses coroutines to dispatch web requests. Coroutines are far more efficient and lightweight than Python threads. Uvicorn and Hypercorn both await the ASGI entrypoint for your application for each inbound request. This task happens concurrently and because of this it doesn’t need a thread pool to dispatch requests into. So in summary you don’t need to set the number of threads for ASGI applications.
Thread Pools for WSGI applications
For WSGI Apps you’ll want to set a second parameter for the number of threads in each worker. Going back to the point I’ve been hammering home, most of the time processing requests is spent doing concurrent tasks. Python threads, whilst are not able to do things in parallel they can still do things concurrently. If you only set the number of workers and leave threads as 1 (the default) then you can only handle that many requests at once. If your server takes 200-500ms to respond to requests, then you’ll quickly hit bottlenecks.
Gunicorn has a setting for configuring threads in a thread pool within in worker:
My general advice is to set the number of threads per worker to 2. You can try adjusting that number depending on the shape of your workload. In Python, that calculation is:
import multiprocessing

num_cpus = multiprocessing.cpu_count()
workers = (num_cpus * 2) + 1
threads = 2
If you want to increase the number beyond 2 you’ll likely need to assess how much memory you have available and if you’re short, allocate more. More threads running concurrently means more temporary state and needs to live in memory.
Docker and fake CPUs
So far we’ve assumed that you’re running workloads directly on the host or within a Virtual Machine. That was a naive assumption in 2023 since so many server applications run on containers. Container runtimes introduce an extra level of complexity because the container host can set CPU shares, it can also constrain which CPUs and Core the container can execute on. It can also set quotas on CPU cycles for the guest container.
The calculation I shared before does depend on those settings. You can read more on the docker documentation.
The important thing here is to test your configuration.
Designing a benchmark
I gave a talk at DjangoCon Australia in 2023 on designing effective load tests that you can check out, but here is a short version of that talk.
Firstly, you shouldn’t take all the advice in this blog post at face value. These are my recommendations, but they are based on assumptions I’ve made. Docker was a good example of something that totally breaks those assumptions. What if you were running in a shared environment with CPU shares? The CPU * 2 + 1 run doesn’t apply.
What you should do is to load test your application. Locust is a free and open source Python package for automated load testing. It is designed to run locally, so it’s not for large-scale load tests (checkout Azure Load Testing for that). You can simulate 100 or 1000 users and measure the response times of your application and the utilization of your CPU.
To install Locust, pip install locust. Then you need to create a locust file. This is a file called locustfile.py by convention that describes the tasks for each of your virtual users. Here’s a very simple load test that navigates to the / route of the app and then also to another page:
from locust import HttpUser, task, between


class BasicUser(HttpUser):
    wait_time = between(3, 5)

    @task(5)  # 5 times more likely to happen
    def index(self):
        self.client.get("/")

    @task
    def locations(self):
        self.client.get("/destinations")
        # Go to Location 1
        self.client.get("/destination/1")
Something important about this test is that I’ve configured the user to be 5 times more likely to visit the index. This is based on my traffic patterns. If for example, you wanted to include a form submission in your load test (which is a good idea) are you assuming that every user submits a form? Load tests should include an element of randomness but they should importantly model real traffic to your website. So if 5% of your visitors click on the “Find out more” button then include that parameter in your load tests.
Another important setting in the test is that the user will wait between 3 and 5 seconds between clicks (wait_time = between(3, 5)). Real users don’t mash on a mouse and go through every page in order with 0ms wait between each page. They browse idly whilst sipping coffee and getting distracted by another TikTok video. Model that in your tests.
Another important point about Locust is that it won’t run the JavaScript included in your HTML. So if your page does a bunch of fancy client-side work and makes API calls using AJAX then Locust isn’t going to do that for you. You might need to include HTTP requests to your API manually inside the tests.
Interpreting Benchmark Results
Once you’ve created your Locust file, start locust using locust -f locustfile.py and set the target URL.
Do not run a load test against a “lemonade stand” web server like python manage.py runserver. Your results will be meaningless. Run the test against your configured WSGI/ASGI server based on the recommendations covered so far in this post.
Set the number of users to a small number to start with like 50 to 100. Set the ramp time (the number of new users per second) to value between 5 and 20. Unless you’re selling Taylor Swift tickets on your websites, your users are unlikely to flood in all at once so spread the initial requests out.
In Locust you’ll then get a few charts. Depending on what you set the ramp value to, you’ll see a spike in the response time followed by a dip and then you should see a stable line:
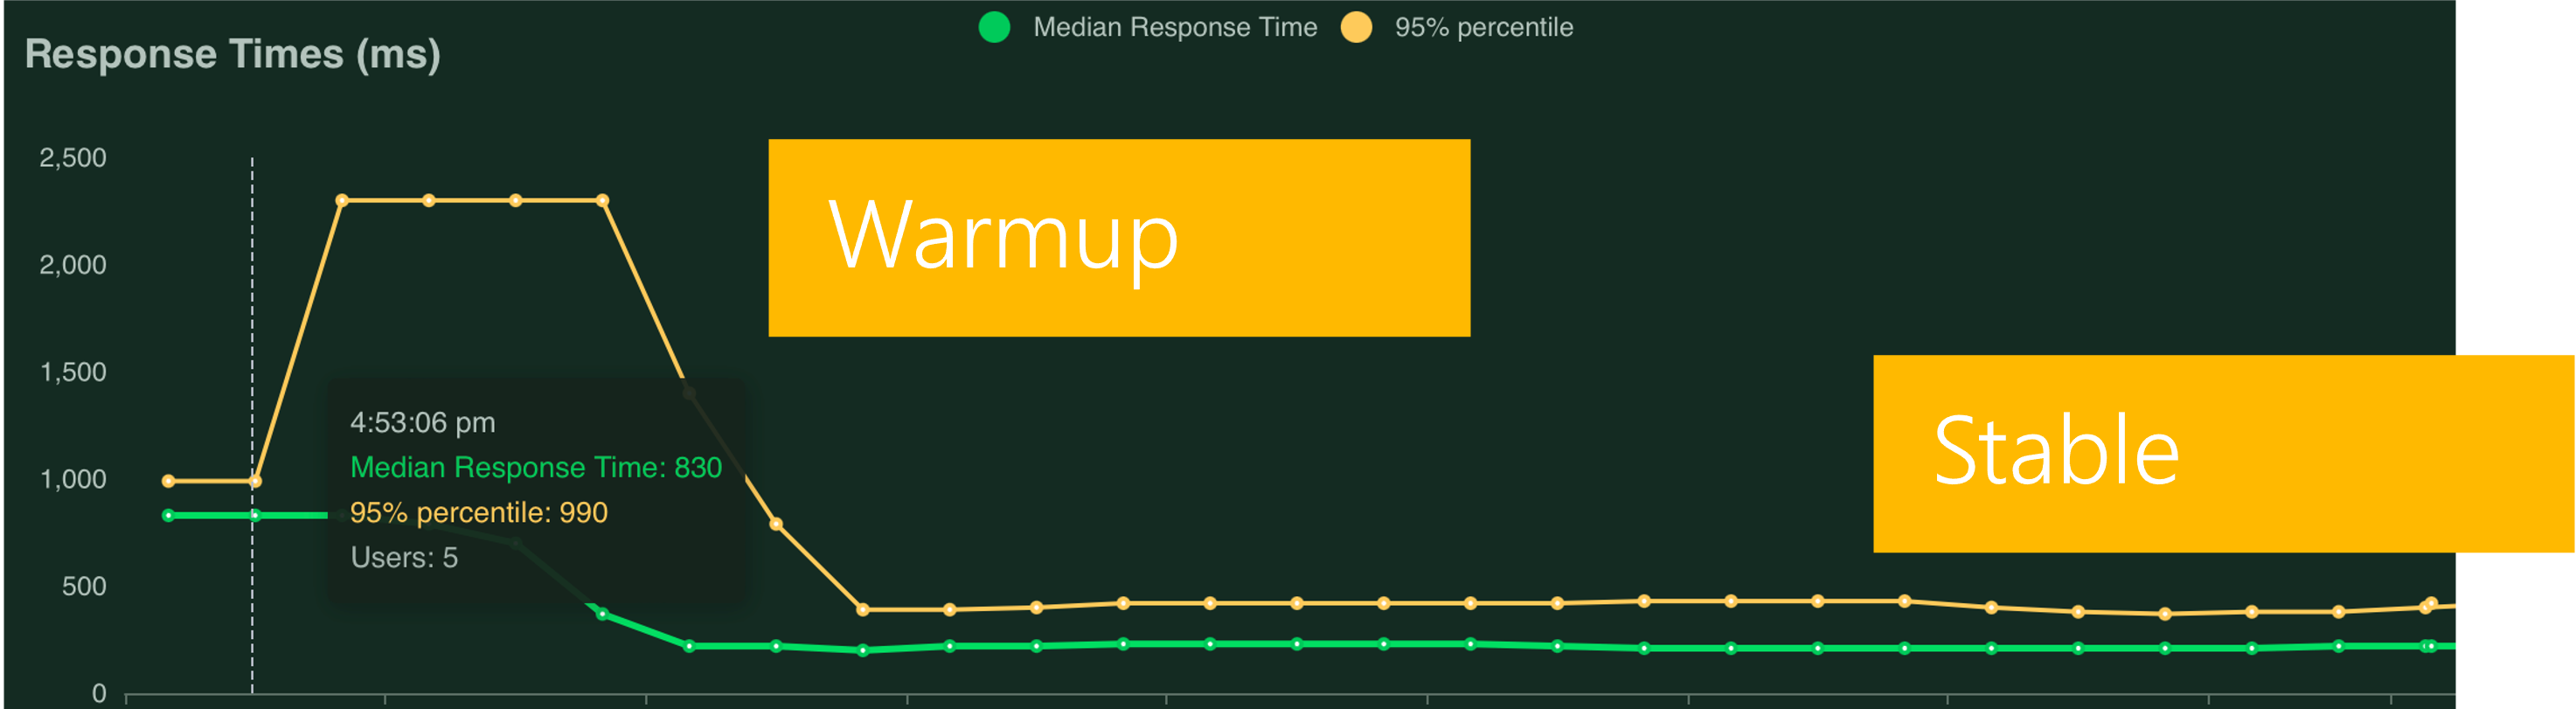
If your benchmark isn’t stable, you’ll see a saturation curve where the response time continues to increase as the number of requests goes up. This means there aren’t any available threads or workers to process new requests and they’re going into the queue. Try increasing the thread value for WSGI applications. For ASGI, if your worker count is already at the suggested value, then you need bigger CPUs or more memory:
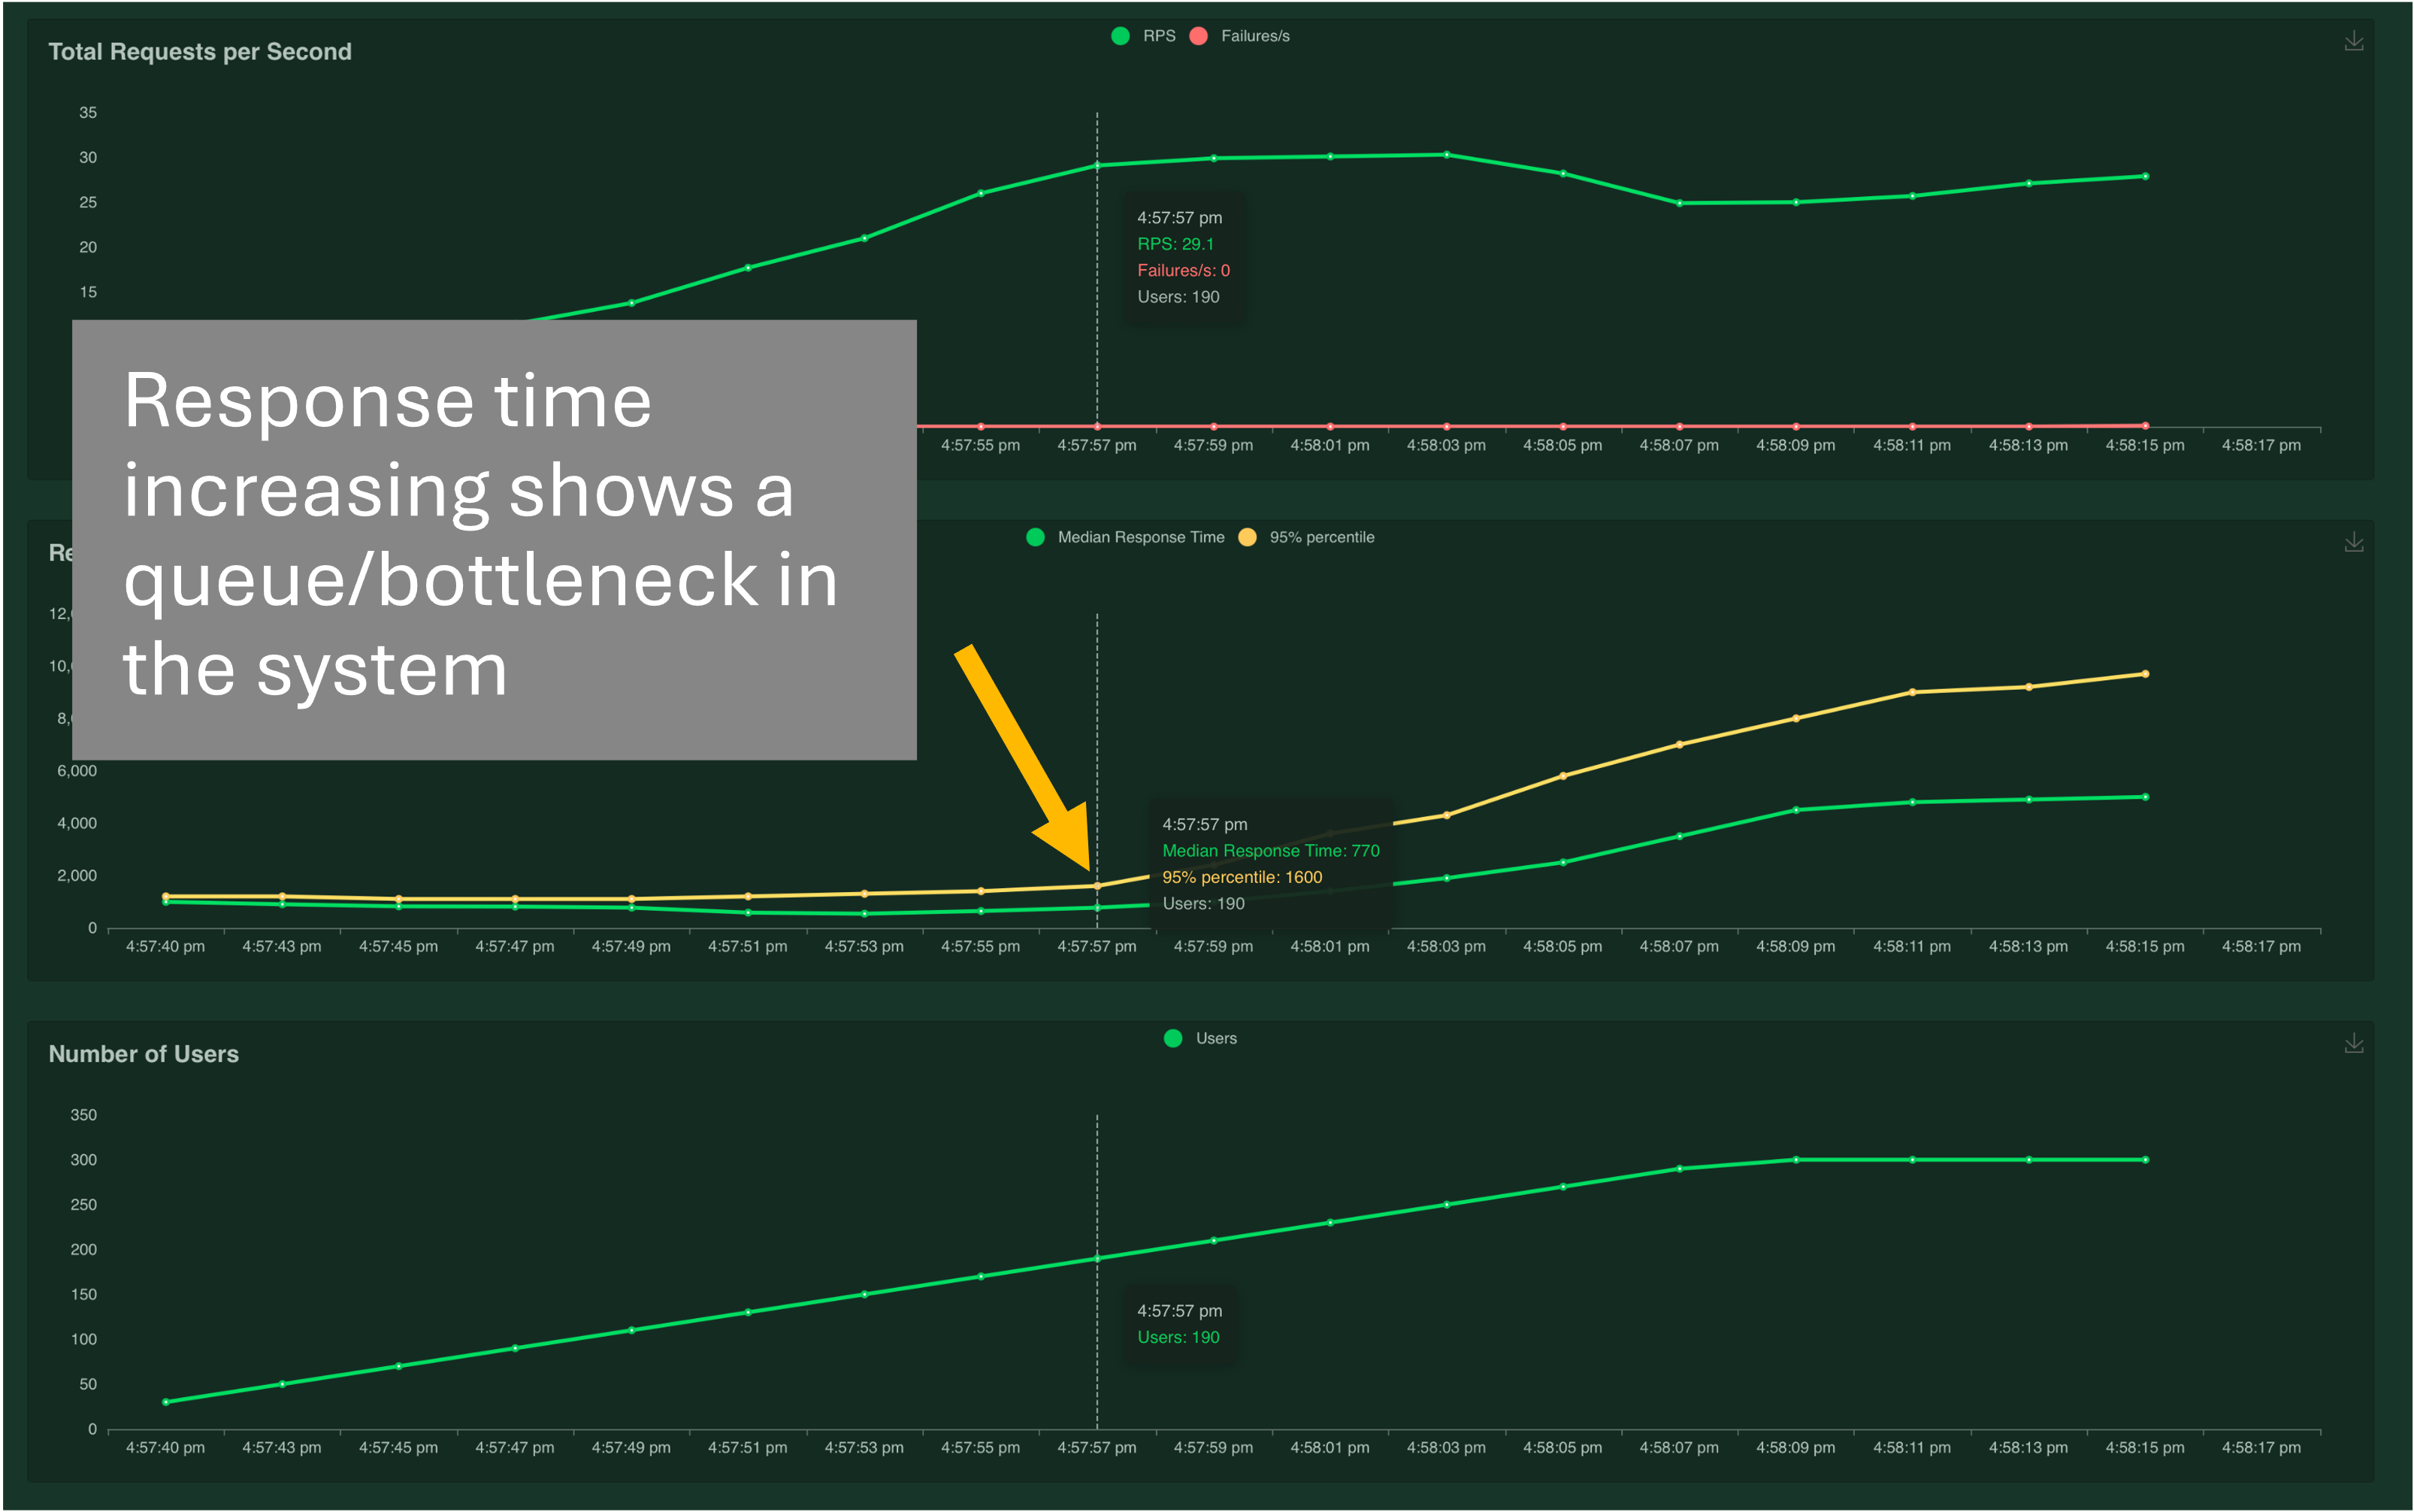
Once you’ve run the first benchmark, try upping the number of users from 100 to 1000 and see how the server responds. If you see a saturation curve and you’re expecting 1000 concurrent users to your site, you need more CPUs, more memory or you need a load balancer to split requests between multiple servers.
Example recommendations
Based on this load test I configured a script to deploy a series of containers onto a shared cloud service with increasing RAM and CPU Cores then measured what was the optimal worker and thread setting. A limiting factor for the number of threads is really the amount of memory allocated to the container. Also, the shape of your workload makes a big difference. This was a small test application with only a small database. You might find that your results look different to this and you need more memory to get that concurrency.
| Configured Cores | Configured Memory | Recommended Workers | Recommended Threads |
|---|---|---|---|
| 1 | 1.75GB | 2 | 1 |
| 2 | 3.5GB | 4 | 2 |
| 4 | 7GB | 4 | 2 |
| 1 | 1.75GB | 2 | 1 |
| 2 | 3.5GB | 4 | 2 |
| 4 | 7GB | 4 | 2 |
| 1 | 3.5Gb | 2 | 1 |
| 2 | 7GB | 4 | 2 |
| 4 | 14GB | 8 | 4 |
An important note about static content (especially for Django users)
I skipped over this quickly, but one important drawback of using Locust as the load testing tool is that it doesn’t simulate all the logic of a browser. Importantly, most HTML pages include lots of links to resources like CSS, Images and JavaScript. Having 100+ assets on a single page is common. So you’ve just load tested your application but Locust won’t have requested any of that content because it didn’t execute the HTML. If you are using something like whitenoise then that load test just measured about 1/100th of the actual traffic you’re going to see with real users. One way to simulate full browser tests is to use the playwright user plugin for Locust. In practice, Django is not suitable as a server for static content. You should be putting something in front of Gunicorn/Uvicorn that delivers static content and ideally caches it also. Your best bet is a CDN, or even a cloud storage service like Azure Storage or Amazon S3. If you don’t want to pay for those, you can use Nginx in front of Gunicorn and configure it to serve static content directly. Then you’ve alleviated a huge burden on Django to route all those requests for static files.
Summary
Here are my suggestions:
- The number of workers for Gunicorn, Uvicorn and Hypercorn should be
CPU * 2 + 1 - The number of threads for WSGI apps should be
WORKERS * 2as a minimum unless you don’t have a lot of memory. If you have more memory you can increase this number - The number of threads for ASGI apps is irrelevant because it uses coroutines to dispatch requests
- ASGI can be faster and scale better than WSGI but only if you’ve written your application as async from the framework to the backend
- Test your setup using Locust or a similar tool to verify these assumptions
- Don’t forget about modelling static content in your load tests
Thanks for reading!
Related Posts